If you’re a parent, you already know how important bath time can be. It’s not just about getting clean—it’s often a moment of calm, play, or winding down with your little one. But there’s one thing most families overlook: the showerhead. Over time, minerals from hard water, soap residue, and even bacteria can build up inside, leading to weaker water flow and less hygienic baths. And when kids are involved, you want to be sure that water is clean and safe.
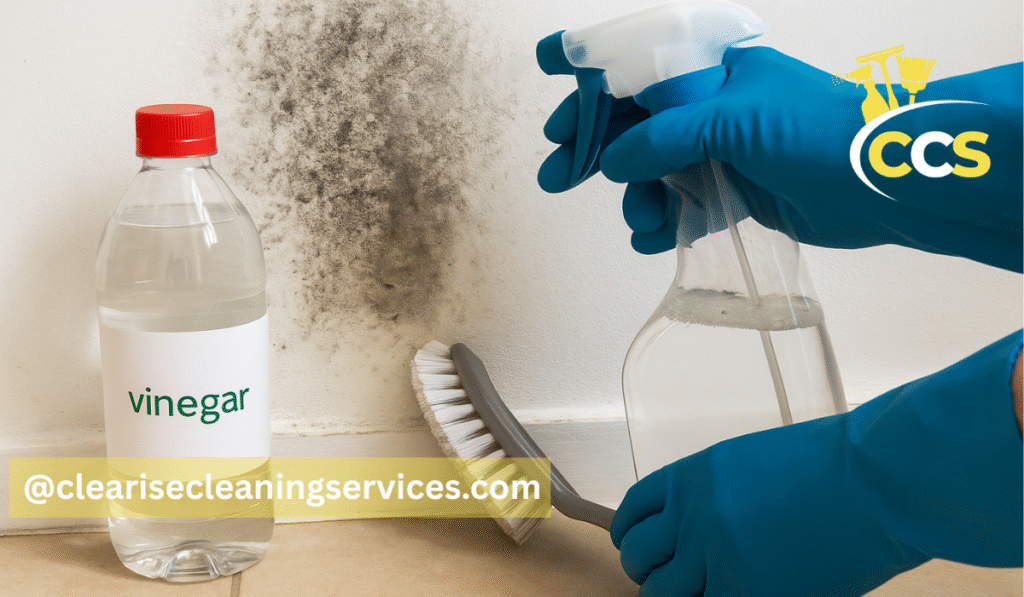
That’s where cleaning your showerhead with vinegar comes in. This simple, natural method doesn’t require expensive cleaners or harsh chemicals, yet it effectively clears out buildup and restores strong, even water pressure.
In this guide, we’ll walk you through everything you need to know—what happens when a showerhead gets clogged, why vinegar is such a powerful solution, and how to use it step by step. You’ll also find natural alternatives if you’d rather skip vinegar, tips for cleaning without removing the showerhead, expert-backed advice for protecting different finishes, and family-friendly shortcuts to make the whole process easier.
By the end, you’ll have a clear, safe, and cost-effective way to keep your showerhead in top shape—without adding extra stress to your busy routine.
Why You Should Be Cleaning Your Showerhead
What Happens Inside the Showerhead
Most of us don’t think twice about the showerhead. As long as water comes out, it seems fine. But inside, a lot more is going on than you realize. If you live in an area with hard water, minerals like calcium and magnesium slowly build up around the tiny nozzles. Over time, these deposits harden and restrict water flow, leading to a weak or uneven spray.
It’s not just minerals, either. Soap scum, mold, and even bacteria can collect in the damp, warm environment of a bathroom. For families—especially those bathing young children—this buildup can make the water less hygienic and more difficult to rinse off soap or shampoo properly.
Why Vinegar Makes Sense
Here’s the good news: you don’t need harsh cleaners to fix the problem. Ordinary white distilled vinegar works wonders because of its natural acetic acid. That acid gently dissolves mineral deposits, loosening up blockages and restoring steady water pressure.
Vinegar is also inexpensive, easy to find, and free of the heavy chemicals you’d want to avoid in a family bathroom. Parents often prefer it over commercial cleaners because it feels safer to use around kids while still doing the job effectively.
Risks of Not Cleaning (Especially for Families)
Leaving a showerhead uncleaned isn’t just an inconvenience. Reduced water flow makes simple tasks—like rinsing soap from a toddler’s hair—more of a struggle. Worse, the buildup inside can harbor bacteria and mold, both of which pose hygiene concerns for children with sensitive skin or weaker immune systems.
There’s also the practical side: ignoring the problem shortens the lifespan of your showerhead. Over time, blockages put extra strain on the fixture, which means you may need to replace it sooner than expected—an avoidable cost for families already juggling budgets.
Preparation: What You’ll Need and Safety Considerations
Before you start cleaning, it helps to gather the right materials and think through a few safety steps. A little preparation makes the whole process quicker and stress-free—especially if you’re juggling family life at the same time.
Materials & Tools
- Distilled white vinegar – Always use plain white vinegar. Malt or brown vinegar can leave sticky residues or stains, and their strong odor is harder to rinse away.
- Plastic bag – Big enough to fit snugly over your showerhead if you’re not removing it.
- Rubber band or zip tie – To secure the bag tightly so it won’t slip.
- Old toothbrush or soft bristle brush – Great for scrubbing away loosened buildup after soaking.
- Toothpick or paper-clip – Handy for unclogging individual nozzles.
- Soft cloth or microfiber towel – For drying and polishing the showerhead after cleaning.
- Optional: Baking soda – A gentle abrasive that works well alongside vinegar for stubborn deposits.
Safety & Surface-Finish Considerations
- Check your showerhead’s finish before soaking. Chrome, brass, and nickel can sometimes react to vinegar if left for too long, so it’s better to use diluted vinegar or shorten soak times.
- Ventilation matters. Vinegar has a sharp smell, so open a window or turn on the bathroom fan while soaking.
- Keep children out of the bathroom during cleaning to avoid curious hands reaching for the vinegar bag.
- Never mix vinegar with bleach or other strong cleaners. The combination creates dangerous fumes.
Time and Planning (for Busy New Parents)
- Choose a time when the shower won’t be needed for a few hours—nap time or playtime often works best.
- If your household uses only one shower, plan around your children’s bath schedule to avoid disruptions.
- For a quick clean, you can do the bag-and-vinegar method while handling other tasks—like folding laundry or prepping dinner—so the process doesn’t eat into family time.
Step-by-Step: How to Clean Shower Head with Vinegar
Cleaning your showerhead doesn’t have to be complicated. Below are the most effective methods, from the quick bag trick to a full soak. Each option is easy to follow, and you can pick whichever suits your bathroom setup and time schedule best.
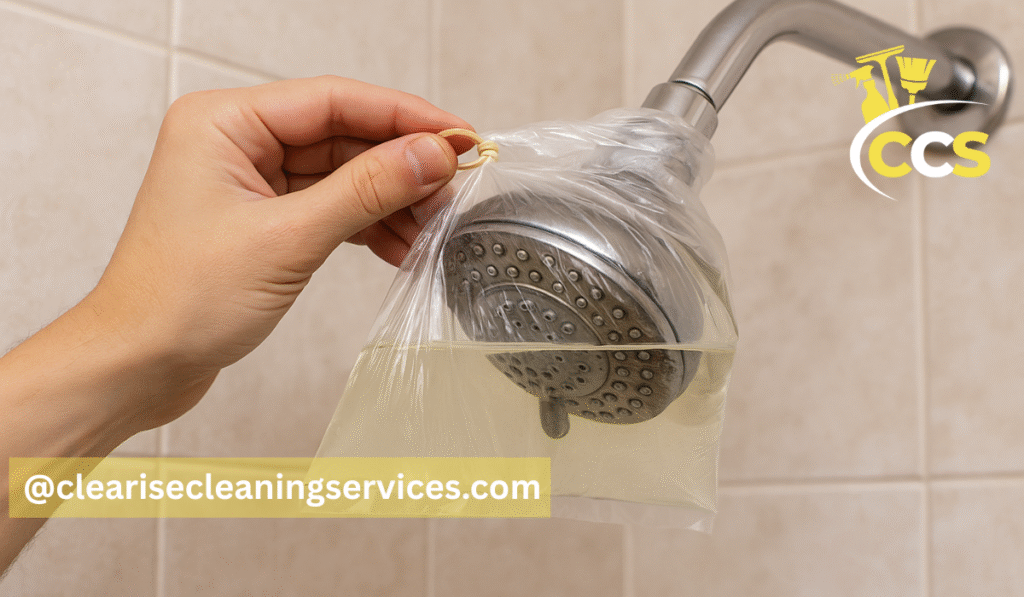
Method A: Without Removing the Showerhead (Bag-Soak Method)
This is the easiest way—perfect if your showerhead is fixed to the wall or ceiling.
- Fill a plastic bag halfway with a mixture of equal parts vinegar and water. For tougher buildup, use full-strength vinegar.
- Place the bag over the showerhead, making sure the nozzles are submerged.
- Secure the bag with a rubber band or zip tie so it won’t slip off.
- Leave it to soak for at least 30 minutes. For heavier buildup, several hours—or even overnight—may be needed. Just be careful if your showerhead has a delicate finish.
- Remove the bag, then run hot water for a minute or two to flush out the loosened deposits.
- Scrub gently with a toothbrush, clean out individual nozzles if needed, then polish with a soft cloth.
Method B: Removing the Showerhead for a Full Soak
If you want a deeper clean, or your showerhead has stubborn clogs, try this method.
- Turn off the water supply to avoid leaks.
- Unscrew the showerhead carefully. Wrap a cloth around the connection before using a wrench to protect the finish.
- Submerge the showerhead in a bowl or container filled with vinegar (or half vinegar and half water if you’re worried about the surface finish).
- Let it soak for several hours, or overnight for heavy buildup.
- After soaking, scrub the nozzles and check the filter screen for trapped debris.
- Rinse thoroughly, then reattach the showerhead. A little plumber’s tape on the threads helps prevent leaks.
- Run the water to flush out any leftover vinegar and debris.
Focused Cleaning: Nozzle/Filter Screen Attention
Sometimes even after soaking, a few nozzles stay blocked.
- Use a toothpick, paperclip, or needle to gently poke through the clogged holes.
- If your showerhead has a filter screen (often inside the connection point), remove it following the manufacturer’s instructions and rinse it clean.
Rinse and Finish
Once everything is cleaned and reattached:
- Run the shower on full hot for 1–2 minutes. This pushes out any remaining vinegar or loosened mineral particles.
- Wipe the showerhead dry with a microfiber cloth to prevent water spots and keep the finish shiny.
Real-Life Parent Tip
If you’re a busy parent, the bag-soak method is your best friend. I often set it up during nap time or while folding laundry—minimal effort with big results. Another hack: keep a small spray bottle of diluted vinegar in the bathroom. A quick spray-and-wipe once a week prevents heavy buildup and saves you from deep cleaning later.
Variations & Related Methods
While plain vinegar is the go-to method, there are other approaches you can try depending on the severity of buildup, your preferences, and what you already have at home. Here are some variations that cover both natural and alternative solutions.
How to Clean Shower Head with Vinegar and Baking Soda
If your showerhead has stubborn mineral deposits that vinegar alone can’t handle, baking soda can give it an extra boost.
- Mix baking soda with a little water to form a thick paste.
- Spread the paste directly over the nozzle face or areas with visible buildup.
- After applying, follow with the vinegar soak (either bag method or full soak). The fizzing reaction between vinegar and baking soda helps lift stubborn grime.
- Once the bubbling stops, scrub gently with a toothbrush and rinse well.
This combo is especially handy for families dealing with hard water or long-neglected fixtures.
How to Clean Shower Head Without Vinegar
Not everyone loves the smell of vinegar, and that’s okay—there are other options.
- Lemon juice: Naturally acidic, lemon juice works much like vinegar. You can use it directly or mix it with water. It’s gentle, smells fresh, and is safe around kids.
- Commercial descalers: If buildup is extremely heavy, store-bought limescale removers are effective. However, they often contain stronger chemicals, so they may not be the best choice for parents who want a low-chemical household.
How to Clean Shower Head Without Taking It Off
Sometimes you just don’t want the hassle of removing a showerhead, especially if it’s a large overhead or rain-style design.
- The bag-soak method is your best friend here—simple, mess-free, and effective.
- For quicker upkeep, fill a spray bottle with diluted vinegar and spritz the showerhead once a week. Wipe it down with a soft cloth for a light clean without any soaking.
How to Clean Shower Head Naturally / Eco-Friendly
For families who prefer eco-friendly methods, vinegar remains the gold standard—it’s natural, safe, and affordable. Combine it with:
- A soft toothbrush or bristle brush for gentle scrubbing.
- A microfiber cloth for polishing without scratching.
- A regular cleaning routine that avoids heavy chemical cleaners.
This method is especially reassuring if you’re cleaning in a bathroom where children bathe.
Cleaning Shower Head with Apple Cider Vinegar?
Some people ask if apple cider vinegar can be used instead of white vinegar. Technically, yes—but it’s not the best choice.
- Apple cider vinegar can leave a sticky residue or light staining because of its natural sugars and color.
- White distilled vinegar is stronger, cheaper, and leaves no residue behind.
- If you do use apple cider vinegar, rinse the showerhead thoroughly afterward and test a small area first to ensure it won’t affect the finish.
How Often Should You Clean It? (Maintenance Schedule)
Keeping your showerhead clean isn’t something you have to do every week, but a regular schedule makes a big difference. The timing depends on your water quality and how often your family uses the shower.
Frequency Guidance
- Hard water areas: If your water has high mineral content, aim to clean the showerhead every 1–3 months. This prevents stubborn limescale from building up.
- Softer water areas: If your water is naturally soft, cleaning every 3–6 months is usually enough.
Quick Touch-Up vs Deep Clean
- Quick touch-ups: Keep a small spray bottle of diluted vinegar in the bathroom. A quick spray once a week—or right after your child’s bath—can stop gunk from forming in the first place. Wipe it down with a cloth, and you’re done.
- Deep cleaning: Every few months, give the showerhead a full soak using the bag method or by removing it completely. This ensures hidden mineral deposits and bacteria are fully cleared out.
Signs You Need to Clean Now
Sometimes your showerhead will tell you it’s time for a cleaning. Watch out for:
- Weaker water flow than usual.
- Uneven spray or nozzles squirting off in odd directions.
- Visible mineral deposits or discoloration around the face of the showerhead.
- Slow rinsing after a child’s bath, when water seems to drip instead of flowing freely.
If you notice any of these signs, it’s better to clean right away rather than waiting for your next scheduled deep clean.
Troubleshooting & Expert Tips
Even with a simple method like vinegar cleaning, questions and small challenges can pop up. Here are practical solutions and expert insights to help you get the best results while keeping your family safe.
What if the Finish is Being Damaged by Vinegar?
Some finishes—like brass, nickel, or decorative plating—are more sensitive to acidic cleaners. If you notice slight dullness or spotting:
- Shorten the soak time. Limit the vinegar contact to about 30 minutes.
- Switch to the spray method. Instead of soaking, spray diluted vinegar directly onto the showerhead, let it sit for a few minutes, then wipe clean.
- Always wipe and rinse thoroughly afterward to protect the surface.
What if Deposits Are Very Heavy or You Have Extremely Hard Water?
- Try using a stronger ratio—two parts vinegar to one part water—but check the finish often to avoid damage.
- For long-term prevention, consider installing a water-softening filter or switching to a showerhead designed with anti-scale features. This reduces buildup and makes cleaning less frequent.
How to Protect the Bag Method for Busy Parents
If you’re multitasking while the showerhead soaks:
- Use a zip tie or clip instead of a rubber band. It holds the bag more securely.
- Place a towel or small bowl underneath the showerhead to catch drips, keeping your bathroom floor safe and mess-free.
How to Keep Kids Safe While Cleaning
- Make sure the vinegar bag is tightly secured so it won’t slip off if curious little ones wander in.
- Ventilate the bathroom to reduce vinegar odor lingering in the air.
- Store vinegar bottles, baking soda, and cleaning tools out of reach—just like you would with any cleaning supply.
Expert Insight: Why the Chemistry Works
Professionals point out that vinegar’s power comes from acetic acid, which lowers pH and dissolves minerals like calcium and magnesium. This chemical reaction breaks down hard deposits without scraping or scratching the nozzles. The non-abrasive action makes it a safe option for most showerheads compared to harsh cleaners or scrub pads.
My Personal Parent-Hack
When you’re juggling childcare, timers are your best friend. Set a reminder on your phone: “Check showerhead soak while baby naps.” This way, you don’t forget and risk over-soaking delicate finishes.
Another trick: don’t waste the leftover vinegar. Once you remove the bag, pour it over your tub surface or bathroom counter. It helps cut soap scum, giving you a two-for-one cleaning session with almost no extra effort.
Conclusion
Cleaning your showerhead with vinegar is one of those small but powerful habits that make everyday family life easier. It’s affordable, safe, and eco-friendly—perfect for homes where kids come first. By using the simple methods outlined here, whether it’s the quick bag soak or a full overnight clean, you’ll restore strong, even water flow without harsh chemicals.
Keeping this routine in place every few months not only protects your showerhead but also ensures healthier, more hygienic baths for your family. The best part? It only takes a little planning, and once it’s done, you’ll notice the difference immediately.
In short, a clean showerhead means fewer hassles, better water pressure, and one less thing to worry about in a busy household. Make it part of your regular bathroom care routine—you’ll thank yourself later when bath time runs smoother and stress-free.
FAQ
Can I Leave The Vinegar Bag On Overnight?
Yes. For most showerheads, a soak of 2–4 hours is plenty, but leaving it overnight is usually safe if the finish isn’t delicate and no one needs the shower. If your showerhead is brass, nickel, or has a special coating, limit the soak to 30 minutes to 1 hour.
Will The Vinegar Smell Linger In The Bathroom?
Only briefly. Running hot water for a minute after cleaning flushes out any vinegar smell along with mineral deposits. Opening a window or turning on the fan will clear the air even faster.
My Showerhead Is Fixed High (like A Rain-style Design). How Do I Do The Bag Method Easily?
Use a tall, sturdy plastic bag and fill it partway with vinegar. Secure it with a zip tie instead of a rubber band for extra hold. If needed, use a safe step stool or ladder—but make sure kids are in another room while you set it up.
Can I Use Apple Cider Vinegar Since It Smells Nicer?
Technically yes, but white distilled vinegar is the better choice. It’s stronger, colorless (so it won’t stain), and cheaper. Apple cider vinegar may leave a sticky residue if not rinsed thoroughly.
Will Vinegar Damage The Rubber Washers Or Parts Inside My Showerhead?
When diluted and rinsed, vinegar is generally safe. However, soaking for too long on delicate finishes or rubber seals could cause wear over time. Inspect washers during cleaning and replace them if they show signs of damage.
After Cleaning Once, Can I Just Forget About It Until Next Year?
Not recommended. A light cleaning every few months prevents heavy buildup, which can shorten the life of your showerhead and reduce water flow. It’s much easier to stay on top of maintenance than deal with a clogged head when you’re trying to bathe a restless toddler.
Disclaimer: The information in this article is provided for general household cleaning purposes only. While vinegar is widely considered a safe and natural option, results may vary depending on your showerhead’s material, finish, and water quality. Always check your manufacturer’s care instructions before using vinegar or any cleaning method, and test on a small area if you’re unsure. Avoid mixing vinegar with bleach or other harsh chemicals. The author is not responsible for any damage or misuse that may occur. For persistent buildup or concerns about water quality, consult a professional plumber or cleaning specialist.
Thanks for visiting Clearise Cleaning Services! Discover more helpful tips and expert cleaning insights by exploring our related categories.