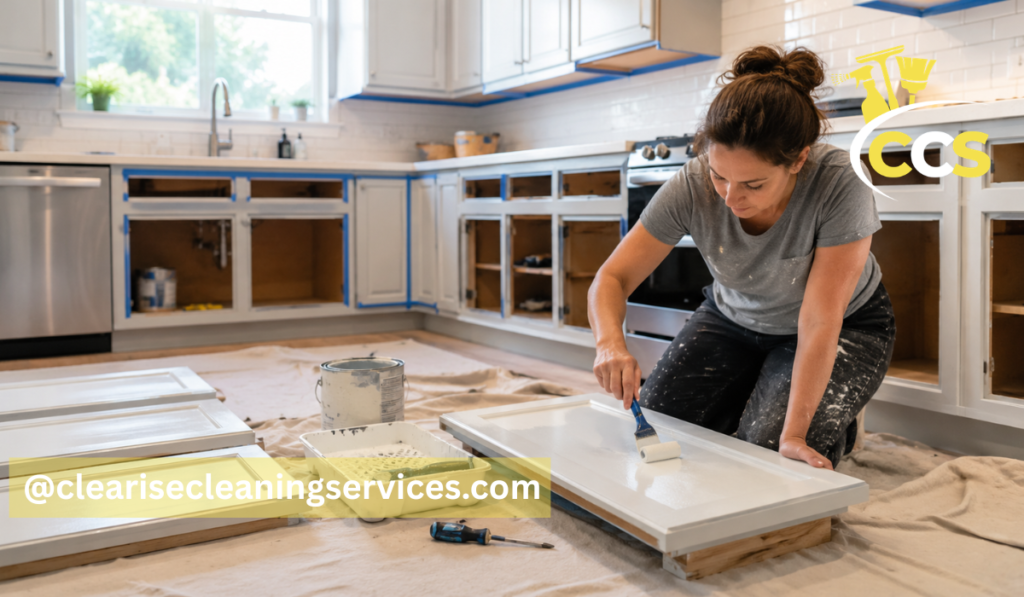
How to paint kitchen cabinets is one of the most searched DIY home improvement topics because it can change the look of a kitchen without the cost of a full remodel. Instead of replacing cabinets, you can refresh the doors, drawers, and frames with the right prep work, primer, paint, and patience.
But cabinet painting is not the same as painting a wall. Kitchen cabinets are touched every day. They collect grease, fingerprints, food splashes, steam, and cleaning product residue. That means the finish must be stronger, smoother, and more durable than normal wall paint.
For beginners, the most important thing to understand is this: the final result depends more on preparation than on painting itself. Cleaning, sanding or deglossing, priming, choosing the right paint, applying thin coats, and allowing enough drying and curing time all matter. Sherwin-Williams also recommends letting primer dry properly, sanding again with very fine sandpaper, and wiping away dust before applying cabinet paint.
This guide explains how to paint kitchen cabinets in a simple, practical way. It covers beginner-friendly steps, professional-looking methods, sanding options, painting without removing cabinet doors, using a sprayer, working with plastic-coated cabinets, and making the finish last longer.
How to Paint Kitchen Cabinets
| Step | What to Do | Why It Matters |
| 1. Remove or protect hardware | Take off knobs, handles, hinges, or tape them carefully | Gives a cleaner finish and avoids paint marks |
| 2. Label doors and drawers | Mark each door and drawer before removing | Helps you reinstall everything correctly |
| 3. Clean with degreaser | Remove grease, dust, and kitchen residue | Paint sticks better to a clean surface |
| 4. Repair damage | Fill holes, dents, or scratches with wood filler | Creates a smooth surface before painting |
| 5. Sand or degloss | Lightly sand or use liquid deglosser | Helps primer grip the cabinet surface |
| 6. Apply primer | Use bonding primer for wood, laminate, or glossy cabinets | Prevents peeling and improves paint durability |
| 7. Paint thin coats | Apply 2 thin coats using brush, roller, or sprayer | Thin coats look smoother and last longer |
| 8. Let paint cure | Wait before heavy use or cleaning | Helps the finish become harder and stronger |
Understanding the Best Way to Paint Kitchen Cabinets
The best way to paint kitchen cabinets is to treat the job like a surface preparation project first and a painting project second. A smooth finish starts with clean, dull, repaired surfaces. Paint needs something solid to hold onto. If grease, gloss, dust, or old residue stays on the cabinet, the new paint may peel, chip, or look uneven.
A good cabinet painting process usually includes removing or protecting hardware, cleaning with a degreaser, sanding or deglossing, applying primer, sanding lightly again, and painting with thin coats. The goal is not just to change the color. The goal is to create a finish that can handle daily kitchen use.
Many homeowners rush because the job looks simple from the outside. In reality, cabinet painting takes time because every door has two sides, edges, corners, and drying time between coats. If you want the cabinets to look professional, plan the project before opening the paint can.
Tools and Materials You Need Before Starting
Before starting, collect everything in one place so the project does not stop halfway. You will need painter’s tape, drop cloths, a screwdriver, labels, a marker, degreaser, clean cloths, wood filler, sandpaper, primer, cabinet paint, brushes, rollers, trays, and protective gloves.
For a smoother finish, use a high-quality angled brush for corners and edges and a small foam or microfiber roller for flat cabinet surfaces. If you want a sprayed finish, you will need a paint sprayer, masking paper, plastic sheeting, and a safe spray area with good airflow.
The most important materials are primer and paint. Regular wall paint is usually not the best choice for cabinets. Cabinet surfaces need a harder finish, so look for cabinet-specific paint, enamel paint, or waterborne alkyd paint. Benjamin Moore notes that waterborne alkyd paints are often used for cabinet projects because they dry to a hard, durable finish and can cure faster than some standard acrylic paints.
How to Prepare Kitchen Cabinets for Painting
Good preparation starts with clearing the kitchen area. Remove items from countertops, protect floors, and cover appliances if needed. If you are removing doors and drawers, label each one before taking it off. A small piece of tape inside the door or on the hinge area can help you remember where everything belongs.
Next, remove knobs, handles, pulls, and hinges if possible. Store screws and hardware in labeled bags. This step may feel small, but it prevents confusion later when you reinstall everything.
Look closely at the cabinet surfaces. Fill dents, scratches, and old hardware holes with wood filler. Once dry, sand the repaired areas smooth. The cleaner and smoother the surface is before primer, the better the finished cabinets will look.
Cleaning and Degreasing Cabinets Before Paint
Cleaning is one of the most important steps when learning how to paint kitchen cabinets. Kitchen cabinets often look clean, but they usually have a thin layer of grease, cooking oil, dust, and hand residue. Paint will not bond well to that layer.
Use a cabinet-safe degreaser or a cleaner made for paint preparation. Trisodium phosphate, often called TSP, is commonly used for heavy cleaning, but always follow the label instructions and use proper protection. For many kitchens, a strong degreasing cleaner and warm water can work well.
After cleaning, wipe the cabinets again with a damp cloth to remove cleaner residue. Then let everything dry fully. Do not sand or prime while the surface is damp, because trapped moisture can affect adhesion.
Should You Remove Cabinet Doors Before Painting?
Removing cabinet doors usually gives the cleanest and most professional result. It allows you to paint edges, corners, frames, and door faces more evenly. It also helps prevent drips around hinges and hardware.
However, removing the doors takes more time and space. You need an area where doors can lie flat while they dry. If you have a small kitchen or limited workspace, you may choose to paint the cabinets without removing them.
For the best result, removing doors is recommended. But if you prepare carefully, protect surrounding areas, and use thin coats, painting without removal can still improve the look of your kitchen.
How to Paint Kitchen Cabinets Without Removing Them
If you want to know how to paint kitchen cabinets without removing them, the process is similar, but protection becomes more important. Tape around hinges, walls, countertops, and cabinet interiors. Cover floors and appliances carefully.
Keep cabinet doors slightly open while painting edges so they do not stick to the frame. Paint one section at a time and watch for drips near corners and hinge areas. Use a brush for edges and a small roller for flat surfaces.
This method is faster, but it may not look as smooth as removing the doors. It works best for small updates, rental-friendly refreshes, or cabinets that are in good shape and only need a color change.
Sanding Kitchen Cabinets the Right Way
Sanding helps primer grip the surface. You do not need to remove all the old finish. The goal is to dull the shiny surface so primer can bond.
Use medium to fine sandpaper, often around 120 to 220 grit, depending on the cabinet surface. Sand lightly and evenly. Pressing too hard can create scratches that show through the paint. After sanding, remove all dust with a vacuum, tack cloth, or damp microfiber cloth.
Sherwin-Williams explains that sanding plays an important role in helping cabinets look more professional, especially when used correctly during the preparation process.
How to Paint Kitchen Cabinets Without Sanding
Many people search for how to paint kitchen cabinets without sanding because sanding can be messy and time-consuming. It is possible in some cases, but you still need to prepare the surface properly.
Instead of sanding, you can use a liquid deglosser or a strong bonding primer made for glossy surfaces. This can work well if the cabinets are already smooth, clean, and not peeling. However, if the old finish is damaged, shiny, or slick, skipping sanding may lead to poor adhesion.
No-sanding methods are convenient, but they are not magic. Cleaning and priming still matter. If you skip both sanding and proper primer, the paint may chip faster.
Choosing the Right Primer for Kitchen Cabinets
Primer helps paint stick better and creates a more even base. It can also block stains, wood tannins, and old colors from showing through.
For wood cabinets, a stain-blocking bonding primer is often a strong choice. For laminate or plastic-coated surfaces, use a primer made for slick surfaces. For dark cabinets being painted white, primer helps reduce the number of paint coats needed.
Let the primer dry fully before sanding lightly and painting. Rushing this step can create a rough or weak finish. A smooth primer coat gives the paint a better surface to sit on.
Best Paint Types and Finishes for Kitchen Cabinets
The best paint for kitchen cabinets should dry hard, clean easily, and resist moisture. Cabinet-specific paint, enamel paint, urethane-modified alkyd paint, and waterborne alkyd paint are common options.
For finish, satin and semi-gloss are popular because they are easier to wipe than flat paint. Satin gives a softer look, while semi-gloss reflects more light and can feel more modern. High-gloss can look dramatic, but it shows imperfections more easily.
Avoid cheap wall paint for cabinets. It may look fine at first, but it can stay soft, mark easily, or wear out faster in a busy kitchen.
How to Paint Kitchen Cabinets for Beginners
For beginners, the best approach is to work slowly and follow a clear order. Start with one door or a small test area if you are nervous. This helps you understand how the primer and paint behave before doing the whole kitchen.
Do not overload the brush or roller. Thin coats look better and dry stronger than thick coats. Thick paint can drip, leave marks, or take much longer to cure.
Beginners should also avoid rushing reassembly. Cabinets may feel dry after a day, but the finish can still be soft underneath. Handle freshly painted doors carefully.
Step-by-Step Kitchen Cabinet Painting Process
Start by labeling and removing doors, drawers, and hardware if possible. Clean every surface with a degreaser and let it dry. Fill holes or damaged areas with wood filler, then sand the cabinets lightly.
After sanding, remove dust completely. Apply a bonding primer in a thin, even coat. Let it dry according to the product instructions. Lightly sand the primer with fine sandpaper, then wipe away dust.
Apply the first thin coat of cabinet paint. Let it dry fully before applying the second coat. Some colors may need a third coat, especially when going from dark to light. After painting, allow the cabinets to dry before reinstalling doors and hardware.
How to Paint Kitchen Cabinets Professionally at Home
To paint kitchen cabinets professionally at home, focus on details. Professionals do not rush prep work. They clean thoroughly, sand evenly, use the right primer, apply thin coats, and allow proper drying time.
A professional-looking finish also depends on controlling dust. Paint in a clean area, keep pets away, and avoid sanding dust near wet paint. If using a brush, finish strokes in the same direction. If using a roller, avoid pressing too hard.
For the smoothest finish, many professionals spray cabinet doors. But even with a brush and roller, you can get a clean result by using quality tools and taking your time.
How to Paint Kitchen Cabinets in 3 Days
Learning how to paint kitchen cabinets in 3 days is possible for a small kitchen, but it requires planning. Day one can be used for removing doors, cleaning, repairing, sanding, and priming. Day two can be used for sanding primer and applying the first coat of paint. Day three can be used for the second coat and light cleanup.
However, a 3-day project does not mean the cabinets are fully cured in 3 days. It only means the main painting work may be completed. Cure time can take longer, depending on the paint, temperature, humidity, and coat thickness.
Use the kitchen gently after reinstalling. Avoid scrubbing, slamming doors, or placing sticky items against freshly painted surfaces.
Brush, Roller, or Sprayer: Which Method Works Best?
A brush is best for corners, grooves, trim, and detailed areas. A roller is useful for flat cabinet panels and frames. A sprayer gives the smoothest finish, but it requires more setup, masking, and practice.
For most beginners, a brush and mini roller are easier and more affordable. For homeowners who want a factory-like finish and are comfortable with setup, spraying can be a better option.
The best method depends on your skill level, budget, workspace, and finish expectations. A careful brush-and-roller job is better than a rushed spray job.
How to Paint Kitchen Cabinets With a Sprayer
If you want to know how to paint kitchen cabinets with a sprayer, start by preparing the area carefully. Sprayers create overspray, so cover floors, walls, counters, and nearby items. Remove doors and spray them in a clean, ventilated space.
Strain the paint if the sprayer instructions recommend it. Test the spray pattern on cardboard before spraying cabinet doors. Move the sprayer smoothly and keep it the same distance from the surface. Apply thin coats instead of trying to cover everything at once.
Spraying can create a beautiful finish, but mistakes can happen quickly. Runs, uneven coverage, and dust can ruin the surface. Practice before spraying the actual cabinet doors.
How to Paint Kitchen Cabinets With Plastic Coating
Plastic-coated cabinets, laminate cabinets, and thermofoil cabinets need special care because paint does not stick easily to slick surfaces. First, clean the surface very well. Then lightly sand or degloss it if the coating allows.
Use a primer made for slick or laminate surfaces. This step is essential. Without the right primer, paint may scratch or peel away. After priming, use a durable cabinet paint and apply thin coats.
If the plastic coating is peeling, bubbling, or lifting, paint may not fix the problem. Loose coating should be repaired or removed before painting, or the finish may fail later.
Common Mistakes to Avoid When Painting Kitchen Cabinets
The biggest mistake is skipping prep. Paint cannot hide grease, dust, peeling finish, or deep scratches. Another common mistake is using the wrong paint. Cabinets need a harder, more washable finish than walls.
Applying thick coats is also a problem. Thick paint may look like it saves time, but it often causes drips and slow drying. Reinstalling doors too soon can also leave dents, chips, or sticking spots.
Avoid painting in a dusty, humid, or very cold area. Temperature and airflow affect how well paint dries and cures.
Drying, Curing, and Reinstalling Cabinet Doors
Drying and curing are not the same. Dry paint feels touchable. Cured paint has reached its stronger, harder final state. Many cabinet paints can feel dry within hours, but full hardness can take days or weeks.
Benjamin Moore’s cabinet refinishing guide notes that Advance paint can dry to the touch in 4 to 6 hours and be recoated in about 16 hours in good conditions. However, other paints may take longer to fully cure. Always follow the paint label.
When reinstalling doors, handle them carefully. Use soft cloths or padding if needed. Avoid aggressive cleaning for the first few weeks.
How to Make Painted Kitchen Cabinets Last Longer
To make painted cabinets last longer, clean them gently and avoid harsh scrubbing. Use a soft cloth and mild cleaner. Wipe spills quickly, especially near the sink, stove, and dishwasher.
Add bumpers to cabinet doors so painted surfaces do not hit each other. Tighten loose handles so fingers do not rub the same painted area repeatedly. Keep moisture under control, especially around sinks.
A long-lasting finish comes from good prep, good paint, and gentle care. Even the best paint can wear faster if the cabinets are cleaned harshly or exposed to constant moisture.
When a YouTube Tutorial Helps and When It Is Not Enough
Searching how to paint kitchen cabinets YouTube can be helpful because videos show techniques visually. A video can help you understand brush movement, sprayer setup, sanding pressure, and door labeling.
However, one tutorial may not match your cabinet type. Wood, laminate, glossy cabinets, plastic-coated cabinets, and damaged cabinets may all need different preparation. Use videos for demonstration, but choose materials and steps based on your actual cabinet surface.
The safest approach is to combine visual learning with product instructions and proper prep work.
Final Checklist Before You Start Painting
Before painting, make sure your cabinets are clean, dry, labeled, repaired, and lightly sanded or deglossed. Confirm that your primer matches your cabinet surface. Check that your paint is made for cabinets or trim and that you have enough time for drying between coats.
Also make sure you have a safe workspace, good airflow, clean tools, and a place for doors to dry without being touched. Once everything is ready, the project becomes much easier and less stressful.
Conclusion
Learning how to paint kitchen cabinets can help you refresh your kitchen without replacing everything. The process is not difficult, but it does require patience. Clean cabinets, proper sanding or deglossing, the right primer, durable paint, thin coats, and enough cure time all work together to create a smooth, lasting finish.
Whether you are painting kitchen cabinets for beginners, trying a no-sanding method, using a sprayer, or working with plastic-coated cabinets, the same rule applies: preparation matters most.
A beautiful cabinet finish does not come from rushing. It comes from following the right process step by step and giving the paint enough time to become strong. When you take your time, your kitchen can look brighter, cleaner, and more modern without a full renovation.
FAQs
Can I Paint Kitchen Cabinets Without Sanding?
Yes, you can paint kitchen cabinets without sanding if the surface is already smooth and clean. However, you should use a strong degreaser and a bonding primer. For glossy, damaged, or peeling cabinets, light sanding is still better for long-lasting results.
What Is The Best Paint For Kitchen Cabinets?
The best paint for kitchen cabinets is a durable cabinet paint, enamel paint, or urethane-modified alkyd paint. Satin and semi-gloss finishes are popular because they are easier to clean and can handle daily kitchen use better than flat paint.
Should I Remove Cabinet Doors Before Painting?
Removing cabinet doors gives a cleaner and more professional finish because you can paint edges, corners, and flat surfaces more easily. You can paint cabinets without removing them, but it requires careful taping and more patience.
How Long Does It Take To Paint Kitchen Cabinets?
Painting kitchen cabinets usually takes 3 to 5 days, depending on kitchen size, drying time, and the method used. The paint may feel dry sooner, but full curing can take longer, sometimes up to a few weeks.
Is Spraying Better Than Brushing Kitchen Cabinets?
Spraying can give the smoothest, factory-like finish, but it needs more setup, masking, and practice. A brush and mini roller are easier for beginners and can still give a clean result if you apply thin, even coats.
Disclaimer: This article is for general informational purposes only. Cabinet materials, paint products, drying times, and results may vary depending on surface condition, climate, tools, and skill level. Always follow product label instructions and test materials before painting the full cabinet area.
Thanks for visiting Clearise Cleaning Services! Discover more helpful tips and expert cleaning insights by exploring our related categories.