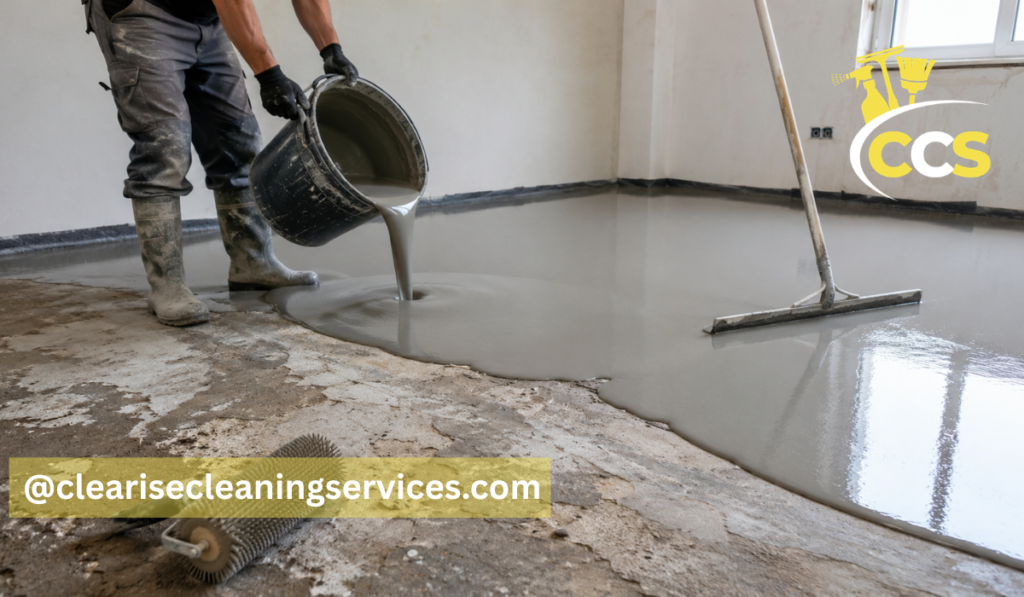
Self leveling concrete is a floor preparation material used to create a smooth, flat, and even surface before new flooring is installed. It is usually made from cement, fine aggregates, and special additives that help it flow across the floor more easily than regular concrete. Once mixed with water, it spreads over low spots, small dips, rough patches, and uneven areas, then hardens into a solid surface.
Homeowners and contractors often use self leveling concrete before installing tile, vinyl, laminate, carpet, engineered wood, or other finished flooring. A floor may look mostly flat at first, but even small dips or bumps can cause flooring problems later. Tiles can crack, vinyl can show waves, laminate can separate, and hardwood can feel uneven underfoot. Self leveling concrete helps solve these issues by creating a better base.
It can be used over many concrete slabs, some approved wood subfloors, and indoor floor areas. Some products may also work in outdoor areas, but only when the product is clearly rated for exterior use. This is important because not every self leveling concrete product is made to handle moisture, temperature changes, or weather exposure.
In this guide, you will learn what self leveling concrete is, how it works, when to use it, how thick it can be applied, why primer matters, what tools are needed, which mistakes to avoid, and how to choose products from brands and stores such as MAPEI, Home Depot, and Lowe’s.
Quick Guide Table
| Topic | Quick Answer |
| Best Use | Leveling uneven floors before installing finished flooring |
| Works On | Concrete slabs and approved wood subfloors |
| Primer Needed? | Yes, primer helps bonding and prevents bubbles or cracks |
| Common Thickness | Depends on product, often featheredge up to 1–2 inches |
| Indoor or Outdoor? | Mostly indoor; outdoor use needs an exterior-rated product |
| Main Tools | Drill, mixing paddle, bucket, gauge rake, spiked roller |
| Biggest Mistake | Skipping primer or adding too much water |
Simple Step-by-Step Guide
- Clean the floor completely
Remove dust, grease, loose concrete, old adhesive, and debris. - Seal gaps and holes
Close cracks, edges, pipe gaps, and openings so the liquid mix does not leak. - Apply the right primer
Use a primer recommended for your subfloor and self leveling concrete product. - Mix with exact water amount
Follow the bag instructions. Too much water can weaken the surface. - Pour and spread quickly
Pour from one area, keep a wet edge, and guide the mix with proper tools. - Let it cure properly
Wait the recommended time before walking on it or installing flooring.
What Is Self Leveling Concrete?
Self leveling concrete is a pourable floor leveling compound designed to smooth uneven floors. It is not the same as regular concrete used for driveways, sidewalks, or structural slabs. Regular concrete is thick, heavy, and usually needs more manual spreading and finishing. Self leveling concrete is thinner when mixed correctly, so it can flow into low areas and form a flatter surface.
The term “self leveling” can be a little misleading. The material does flow well, but it does not do every part of the job by itself. You still need to prepare the surface, use primer, mix it correctly, pour it quickly, and guide it into place. In many projects, a gauge rake, smoothing tool, or spiked roller is used to help the product spread evenly and release trapped air.
Most self leveling concrete products are used as underlayments. This means they are placed under the final flooring, not used as the finished surface. Some special products may be designed for exposed or polished finishes, but many common products are meant to be covered with tile, vinyl, laminate, carpet, or wood flooring.
How Self Leveling Concrete Works on Uneven Floors
Self leveling concrete works by flowing across the floor and filling low areas. When mixed with the right amount of water, it becomes fluid enough to move into dips and shallow uneven spots. As it settles, it creates a smoother plane across the surface.
The product hardens through a cement curing process. This means it does not simply “dry” like paint. It becomes stronger as the cement reacts with water. That is why adding too much water can be a serious mistake. Extra water may make the mixture easier to pour, but it can weaken the surface, cause powdering, or lead to cracking.
A good result depends on bond, flow, and timing. The compound must bond to the floor below it. The mixture must flow at the correct consistency. The installer must also work fast because many self leveling compounds have a short working time. Once the material starts to set, it should not be overworked.
When Self Leveling Concrete Is the Right Choice
Self leveling concrete is a good choice when a floor has dips, shallow low spots, rough patches, or small uneven areas that need correction before flooring is installed. It is especially useful when the finished floor requires a very flat base.
Tile, vinyl plank, laminate, and large-format flooring products often need a smooth and stable surface. If the subfloor has waves or dips, the finished floor may not sit properly. Self leveling concrete helps create the type of surface these flooring materials need.
However, it is not the right answer for every floor problem. If the floor is moving, rotten, badly cracked, structurally weak, or sinking because of foundation issues, the main problem should be repaired first. Self leveling concrete can improve the surface, but it cannot fix a failing structure underneath.
Common Uses for Self Leveling Concrete in Homes and Buildings
Self leveling concrete is commonly used in basements, bathrooms, kitchens, laundry rooms, living areas, and commercial spaces. It is often used when old flooring has been removed and the slab underneath is rough, pitted, or uneven.
In homes, it may be used before installing luxury vinyl plank, ceramic tile, porcelain tile, laminate, or engineered wood. In commercial buildings, it is often used to prepare large floor areas before carpet, vinyl sheet goods, or other flooring systems are installed.
It can also be used to cover some radiant floor heating systems. When heating cables or tubes are placed on the floor, a self leveling compound can help cover and protect them while creating a smooth surface for the finished floor. In this type of project, it is important to use a product approved for radiant heat and follow the heating system instructions carefully.
Self Leveling Concrete for Concrete Slabs
Concrete slabs are one of the most common surfaces for self leveling concrete. A slab may become uneven over time because of settling, moisture, poor finishing, or surface damage. In older homes, basement and garage slabs may have low spots, rough texture, or small cracks that need correction.
Before pouring self leveling concrete over a slab, the surface must be clean and solid. Dust, grease, paint, oil, loose concrete, old adhesive, and sealers can stop the compound from bonding properly. In many cases, grinding or mechanical cleaning may be needed if the slab has coatings or weak surface material.
Cracks should also be checked. Small non-moving cracks may be filled before leveling, but wide or active cracks may need proper repair. If a crack continues to move, the leveling compound above it may crack too. The goal is to create a clean, stable surface before the product is poured.
Can Self Leveling Concrete Be Used Outdoors?
Some self leveling concrete products can be used outdoors, but many are made only for indoor use. This is one of the most important details to check before buying. Outdoor surfaces face rain, sun, freeze-thaw cycles, temperature changes, and more moisture than indoor floors.
If you need self leveling concrete outdoor, choose a product that clearly states it is suitable for exterior use. Do not assume that an indoor floor leveler will work outside. Products made only for interior underlayment may break down, crack, or fail when exposed to weather.
Outdoor projects also need proper drainage. Self leveling concrete should not be used to remove needed slope from patios, balconies, sidewalks, or areas where water must drain away. A perfectly level outdoor surface can trap water, which may create bigger problems later.
Self Leveling Concrete Thickness: How Deep Can It Be Applied?
Self leveling concrete thickness depends on the product. Some products can be applied from a very thin featheredge up to around 1 inch, while others may allow thicker pours. For example, one Sika self-leveling underlayment listed by Lowe’s describes a typical application thickness from 1/25 inch to 2 inches and notes that the product is for interior concrete and cement-based substrates.
This is why reading the product label matters. One bag may not have the same thickness limits as another. If your floor has a deep low spot, you may need a product designed for deeper pours, multiple layers, or a different repair method before leveling.
Thickness also affects drying time, material cost, and floor height. A thicker pour uses more bags and may take longer before finished flooring can be installed. It may also raise the floor enough to affect doors, transitions, cabinets, stairs, or nearby rooms.
Why Self Leveling Concrete Primer Is Important
Self leveling concrete primer is one of the most important parts of the job. Primer helps the leveling compound bond to the floor. It also helps control how quickly the subfloor absorbs water from the mix.
Without primer, a dry concrete slab or wood subfloor may pull moisture out of the leveling compound too quickly. This can cause bubbles, weak bonding, cracks, pinholes, or a rough surface. Primer creates a better connection between the old surface and the new leveling layer.
MAPEI describes Primer T as a low-VOC, water-based acrylic primer made to improve the adhesion and performance of self-leveling underlayments on porous and nonporous substrates. MAPEI also offers Primer E, an epoxy primer and bonding agent used with its self-leveling underlayments in higher-stress bonding situations.
The correct primer depends on the product and the surface. A concrete slab, plywood subfloor, old tile, or dense nonporous surface may each require different preparation. Always match the primer to the self leveling concrete product and follow the manufacturer’s instructions.
Essential Self Leveling Concrete Tools You Need
A successful self leveling concrete project needs the right tools before the first bag is opened. Once mixing starts, there is not much time to search for missing equipment.
The basic tools usually include a heavy-duty drill, mixing paddle, clean mixing buckets, measuring container for water, gauge rake, smoothing tool, spiked roller, margin trowel, gloves, eye protection, and spiked shoes for larger pours. You may also need foam tape, caulk, or sealant to close gaps around the room.
The mixing tool is especially important. A small drill may overheat or fail when mixing heavy floor compound. A proper mixing paddle helps remove lumps and creates a smooth mixture. Clean water measurement is also critical because too much or too little water can affect flow and strength.
For larger rooms, it is often helpful to have more than one person. One person can mix while another pours and spreads. This helps maintain a wet edge, which means each fresh batch blends into the previous batch before it starts setting.
Step-by-Step Structure for Applying Self Leveling Concrete
The first step is preparation. Remove old flooring, loose debris, dust, grease, paint, weak concrete, or anything that may block bonding. Vacuum the floor carefully. Check the surface for holes, gaps, cracks, and openings where the liquid compound could leak.
Next, seal the perimeter and any floor penetrations. Self leveling concrete is very fluid, so it can escape through small gaps under walls, around pipes, or through cracks. Sealing these areas prevents leaks and helps keep the pour where it belongs.
After that, apply the correct primer. Let it dry or become ready according to the product directions. Do not rush this step, and do not skip it.
Then mix the self leveling concrete with the exact amount of water listed by the manufacturer. Add water first, then powder, unless the product instructions say otherwise. Mix until the compound is smooth and lump-free.
Pour the mixture onto the floor, starting in one area and working steadily. Guide the material with a gauge rake or smoothing tool. Use a spiked roller if recommended to release trapped air and help the surface settle. Continue mixing and pouring quickly so each batch joins smoothly with the last one.
Finally, protect the floor while it cures. Keep traffic, dust, fans, and direct heat away unless the product instructions allow them. Wait the required time before walking on it or installing finished flooring.
Self-Leveling Concrete Mapei and Other Popular Product Options
Self-leveling concrete MAPEI products are widely used for floor preparation. MAPEI offers primers and self-leveling underlayments for different surfaces and project needs. Its Primer T is listed as an all-purpose primer for self-leveling underlayments and is also shown as available through Lowe’s channels.
Other common brands include Sika, Custom Building Products, Henry, Ardex, and QUIKRETE. Each brand has different products for different uses. Some are made for concrete only, some can be used over wood with the right preparation, and some are designed for faster flooring installation.
The best product is not always the most popular one. The right choice depends on your subfloor, the depth you need, the finished flooring, the room conditions, and whether the area is indoors or outdoors.
Buying Self Leveling Concrete at Home Depot and Lowe’s
Many homeowners search for self leveling concrete Home Depot or self-leveling concrete Lowe’s because these stores carry common floor leveling products, primers, and tools. This can be convenient for DIY projects because you can often buy the leveler, primer, mixing paddle, buckets, and floor preparation supplies in one place.
When shopping, do not choose a product only by price. Check the surface compatibility, indoor or outdoor rating, thickness range, drying time, primer requirements, and flooring installation window. A product that works well for a basement concrete slab may not be the right choice for a plywood subfloor or exterior patio.
Also check bag coverage carefully. Coverage depends on thickness. One bag may cover a large area at a very thin layer, but far less area at 1/2 inch or 1 inch thick. It is better to calculate before starting and buy enough bags for a continuous pour.
Common Mistakes That Can Ruin a Self Leveling Concrete Project
One of the biggest mistakes is skipping primer. Primer is not an optional extra. It helps bonding and helps prevent problems such as bubbles, cracks, and weak spots.
Another common mistake is adding too much water. The mix may look easier to pour, but the final surface can become weaker. It may dry dusty, soft, or uneven. Always use the water amount listed on the bag.
Working too slowly is also a serious problem. Many self leveling concrete products begin setting quickly. If you pause too long between batches, the floor may develop ridges, cold joints, or uneven transitions.
Poor surface cleaning can also cause failure. Dust, old adhesive, grease, paint, or loose material can stop the compound from bonding. A clean and stable surface is just as important as the product itself.
Another mistake is using the wrong product outdoors or over the wrong subfloor. Always confirm that the product is approved for your exact situation.
How Long Self Leveling Concrete Takes to Dry and Cure
Drying and curing times vary by product, thickness, temperature, humidity, and airflow. Some products may allow light foot traffic in a few hours, while others take longer. Some allow tile installation fairly quickly, while moisture-sensitive flooring such as wood, laminate, or vinyl may require more waiting time.
For example, the Sika product listed by Lowe’s says it can be walked on after about 2 to 3 hours at 73°F, and floor coverings may be installed after 1 to 3 days depending on the flooring type and conditions.
It is important not to rush finished flooring installation. A surface may feel hard on top but still contain moisture inside. Installing flooring too soon can trap moisture and lead to adhesive failure, odor, swelling, or flooring damage.
Self Leveling Concrete Before Tile, Vinyl, Laminate, or Hardwood
Self leveling concrete is often used before tile because tile needs a flat and stable surface. Uneven floors can cause tile edges to sit higher than others, which is called lippage. A poor base can also lead to cracked grout or cracked tile.
Vinyl flooring also benefits from a smooth surface. Thin vinyl and luxury vinyl plank can show bumps, seams, and rough patches from the subfloor below. A smooth leveling layer helps create a cleaner finished look.
Laminate and hardwood need flatness more than perfect level. This means the floor does not always need to be perfectly horizontal, but it must not have sharp dips or humps. If the floor is too uneven, planks may flex, separate, squeak, or wear out faster.
Before installing any flooring, always compare the flooring manufacturer’s flatness requirements with the condition of your leveled floor.
How to Know If Your Floor Needs Professional Leveling
A small self leveling concrete project may be manageable for a careful DIY homeowner, especially in a small room with a simple concrete slab. However, some situations are better handled by professionals.
You may need professional help if the floor has major slopes, deep low spots, moisture problems, structural cracks, rotten wood, large areas to pour, or complicated transitions. A professional can also help if the finished flooring is expensive and the subfloor must meet strict flatness standards.
Professional leveling is also a good idea when radiant heating systems are involved, when the job requires multiple pours, or when the floor must meet commercial flooring requirements. Mistakes can be expensive to fix, so it is better to get help when the project is beyond basic surface correction.
Conclusion
Self leveling concrete is a practical way to create a smoother, flatter surface before installing new flooring. It can help fix uneven concrete slabs, rough subfloors, shallow dips, and damaged areas that would otherwise affect tile, vinyl, laminate, hardwood, or carpet.
The best results come from careful preparation. The floor must be clean, stable, sealed at gaps, and properly primed. The product must be mixed with the correct water amount, poured quickly, and applied within the approved thickness range. The right tools also make a big difference, especially for larger rooms.
If your floor has minor uneven areas and the subfloor is solid, self leveling concrete may be a good solution. If the floor has serious movement, moisture issues, structural damage, or deep slopes, it is better to repair the main problem first or speak with a flooring professional. Used correctly, self leveling concrete can give your finished floor the smooth and lasting base it needs.
FAQs
What Is Self Leveling Concrete Used For?
Self leveling concrete is used to smooth uneven, rough, dipped, or damaged floors before installing tile, vinyl, laminate, carpet, or wood flooring.
Do You Need Primer Before Self Leveling Concrete?
Yes, primer is usually required. It helps the compound bond to the floor and reduces bubbles, cracks, weak spots, and uneven curing.
Can Self Leveling Concrete Be Used Outdoors?
Only some products can be used outdoors. Always choose an exterior-rated self leveling concrete if the area is exposed to weather or moisture.
How Thick Can Self Leveling Concrete Be Poured?
Thickness depends on the product. Some can go from featheredge to around 1 inch, while others allow deeper pours. Always check the bag instructions.
Is Self Leveling Concrete Easy For DIY Projects?
Small areas can be DIY-friendly with proper preparation, tools, and timing. Large rooms, deep dips, or damaged subfloors may need professional help.
Disclaimer: This article is for general informational purposes only. Product requirements, thickness limits, drying times, and primer needs can vary by brand and surface type. Always read the manufacturer’s instructions before using self leveling concrete, and consult a flooring professional for structural damage, moisture problems, or large leveling projects.
Thanks for visiting Clearise Cleaning Services! Discover more helpful tips and expert cleaning insights by exploring our related categories.