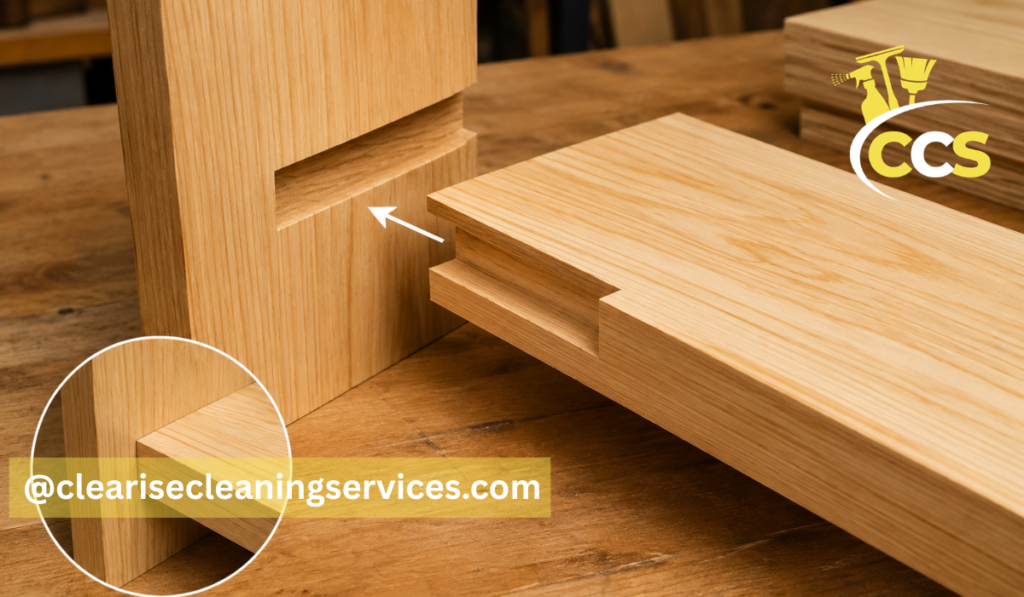
A dado joint is made by cutting a flat-bottomed, three-sided channel into one board and fitting another board into it. The channel is normally cut across the grain of the receiving piece. Once the second board sits in the recess, the bottom supports it while the two shoulders help prevent sideways movement.
This simple connection is common in bookcases, cabinets, shelves, drawers, and other furniture. Instead of asking glue, screws, or nails to carry the entire load, the dado gives the mating board a physical seat. It also helps position parts accurately during assembly.
A dado can be visible or hidden and may be cut with a router, table saw, or hand tools. The right version depends on the material, expected load, desired appearance, and available equipment. This guide covers its types, uses, cutting methods, benefits, limitations, and common mistakes.
Dado Joint Quick Guide
| Type or Cut | Basic Shape | Where It Is Cut | Visibility | Common Use |
| Through dado | U-shaped channel | Across the full width of a board | Visible from the edge | Utility shelves, cabinet dividers, and workshop furniture |
| Stopped dado | U-shaped channel that ends early | Across part of the board | Hidden from the front edge | Finished cabinets, bookcases, and display furniture |
| Rabbet-and-dado joint | Dado combined with a rabbeted mating board | Both connecting pieces are shaped | Usually less visible | Heavy shelves, cabinet boxes, and drawer construction |
| Groove | U-shaped channel | Parallel to the grain | Depends on placement | Drawer bottoms, panels, and cabinet backs |
| Rabbet | L-shaped recess | Along an outside edge | Often visible before assembly | Cabinet backs, frames, and overlapping board connections |
Step-by-Step Guide to Making a Dado Joint
- Measure the mating board: Check its actual thickness rather than relying only on its labeled size.
- Mark the joint location: Draw clear lines showing the dado’s width, depth, and distance from the board’s edge.
- Choose the cutting method: Use a router, compatible table-saw setup, or hand tools according to the project and available equipment.
- Secure the workpiece: Clamp the board firmly and support large or narrow pieces to prevent movement.
- Make a test cut: Use scrap material of the same thickness to check the tool setup and final fit.
- Cut the dado gradually: Remove the material in controlled passes, especially when using a router or hand tools.
- Clean the channel: Remove ridges, dust, and loose fibers with a chisel, router plane, or careful finishing pass.
- Test the mating board: The board should fit snugly without rattling or requiring excessive force.
- Dry-fit the assembly: Check shelf position, squareness, alignment, and visible edges before applying glue.
- Complete the joint: Apply suitable woodworking glue and add fasteners only when required by the design.
Dado Joint Pronunciation and Other Names
The usual dado joint pronunciation is DAY-doh joint. Merriam-Webster describes the woodworking meaning of dado as a rectangular groove used to form a joint, specifically one cut across the grain.
“Dado” is the familiar American term. British woodworkers often call the same connection a housing joint, while “trench joint” also appears in some European and traditional woodworking sources. Plans from different countries may therefore use different names for a very similar cut.
How a Dado Joint Works
The receiving board has a rectangular recess with a bottom and two side walls. The mating board slides into this recess, where its end rests on the bottom and its faces contact the sides. When the width is accurate, the parts locate each other naturally and remain steadier while the assembly is clamped.
The bottom carries downward force, while the shoulders resist sideways movement and rotation. Glue may be applied to the contact surfaces, and screws or nails can be added when the design needs more holding power.
A dado can restrain a part, but it does not stop normal wood movement. Solid wood still swells and shrinks as its moisture content changes, mainly across its width and thickness. Good design considers grain direction and avoids trapping wide solid-wood parts so tightly that they cannot move. The USDA Forest Products Laboratory recommends allowing large solid-wood pieces to move across the grain.
Dado Joint vs. Groove vs. Rabbet
These cuts look similar, but their direction and location are different. A dado traditionally crosses the grain, a groove follows it, and a rabbet reaches an outside edge of the board.
| Joint or cut | Shape | Usual grain direction | Position | Common purpose |
| Dado | U-shaped channel | Across the grain | Inside a board’s face | Shelves, dividers, and cabinet parts |
| Groove | U-shaped channel | With the grain | Inside a face or edge area | Panels, drawer bottoms, and tongues |
| Rabbet | L-shaped recess | Often with the grain | Along an outside edge or end | Cabinet backs, sides, glass, and overlapping parts |
A dado and a groove have material on both sides of the cut. A rabbet reaches an outside edge, leaving one shoulder rather than two.
Main Types of Dado Joints
The main variations are the through dado, stopped or blind dado, and rabbet-and-dado joint. They use the same basic idea, but their appearance and preparation differ.
A through dado is generally the easiest because it crosses the full board. A stopped dado ends before an edge, hiding the joint from normal view. A rabbet-and-dado joint requires shaping both pieces but creates clear mechanical alignment.
Beginners often start with a through dado in plywood or medium-density fiberboard because the layout is simple. Stopped and rabbeted versions become useful when an edge will remain visible or a more controlled fit is required.
Through Dado Joint
A through dado runs from one edge of the receiving board to the other. Its end and the inserted board are visible from the side. That may be acceptable on workshop storage, utility cabinets, painted projects, or pieces where trim or a face frame covers the edge.
The cut is simple to mark because the tool can enter before one edge and leave after the opposite edge. A router can follow a straight guide, while a compatible table-saw setup can make the recess with suitable crosscut support. Hand-tool users can saw the shoulders, remove waste with a chisel, and level the bottom with a router plane. Lee Valley demonstrates router planes being used for both through and stopped dadoes.
Through dadoes work well for fixed shelves, cabinet partitions, storage units, and internal dividers. Their main limitation is the visible side profile.
Stopped or Blind Dado Joint
A stopped dado ends before reaching the front or another visible edge. It allows a shelf or divider to be housed securely while leaving the outside face clean.
The mating board normally needs a small notch so its front corner can pass the uncut part of the receiving board. This notch must be accurate: one that is too large creates a visible gap, while one that is too small prevents the shelf from seating fully.
A plunge router is well suited to the job because the bit can enter and leave within marked limits. A router bit normally leaves a rounded end, which can remain hidden behind the notched board or be squared with a chisel. Router and guide systems are commonly used to make controlled dado and groove cuts.
Stopped dadoes suit finished bookcases, display units, and cabinets with exposed edges. They require more control than through cuts but provide a neater appearance.
Rabbet Dado Joint
A rabbet dado is more precisely called a rabbet-and-dado joint. A dado is cut in the receiving piece, and a rabbet on the mating piece creates a reduced tongue that fits into it.
The rabbet shoulder meets the face of the receiving board while the tongue sits inside the channel. This gives the parts a clear stopping point and can make cabinet or drawer assembly easier to position.
This joint is useful for drawer boxes, cabinet tops and bottoms, and sheet-goods construction. It takes more effort than a standard dado because the dado width, rabbet depth, tongue thickness, and shoulder location must all match correctly.
Common Dado Joint Uses
Fixed shelving is one of the most familiar dado joint uses. In a bookcase, the shelf ends sit in channels cut into the side panels. The recess supports the ends and keeps the shelf from sliding or twisting. Long shelves still need suitable material and thickness because the joint alone cannot prevent sagging across an excessive span.
Cabinetmakers use dadoes for tops, bottoms, fixed shelves, and vertical partitions. The channels create accurate assembly lines and help a cabinet box remain square. A back panel, face frame, glue, screws, or nails may add further stiffness.
Grooves rather than cross-grain dadoes are often used for drawer bottoms because they usually run along the drawer sides. Dadoes remain useful for drawer dividers and crosswise organizers, while rabbet-and-dado joints can connect drawer fronts, backs, and sides.
Other applications include media units, closet systems, shop cabinets, toy storage, and furniture partitions. The joint is most useful when one part meets the broad face of another and needs support plus reliable alignment.
Dado Joint Advantages and Disadvantages
The main advantage of a dado joint is mechanical support. The channel carries part of the load, controls the mating piece’s position, and provides more contact area for glue than a simple edge-to-face butt joint. The shoulders also limit rotation, helping shelves and partitions feel more secure.
Dadoes can simplify assembly. Matching channels place shelves at consistent heights, and a jig or fixed machine setup can produce repeatable cuts across several parts.
The main disadvantage is material removal. Every dado makes the receiving board thinner at that point. An unnecessarily deep cut can weaken a thin panel, especially near another cut, fastener, or stress point. There is no single correct dado depth for every project; the material, board thickness, load, and complete design must be considered.
Poor fit creates further problems. An oversized dado leaves gaps and weak alignment. An undersized one can damage plywood edges, scrape away glue, or prevent the assembly from closing. A properly prepared glue joint should bring the contacting surfaces closely together without relying on excessive force.
Through dadoes also remain visible unless covered, while stopped versions require more careful cutting. Solid wood movement is another consideration: a dado may hold a board in position, but it cannot eliminate swelling and shrinkage caused by changing humidity.
Planning the Joint with Measurements and a Dado Joint Drawing
Measure the actual mating board rather than trusting only its labeled size. Plywood and other sheet goods are not always exactly as thick as their common name suggests, and separate products or batches may vary. For example, plywood sold under a common or nominal measurement may list a smaller actual thickness.
Mark the reference face, front edge, joint position, width, and intended depth. A simple dado joint drawing can prevent mistakes by showing which board receives the channel, how the second piece enters it, and which edges will remain visible. Add grain direction, shelf spacing, and any setback from the front.
Choose a depth that locates and supports the part without removing more material than needed. Instead of applying one fixed fraction to every project, consider the receiving board’s thickness, the material’s strength, the load, and whether a back, frame, fasteners, or glue will add support.
Lay out matching dadoes from the same reference edge. When preparing two cabinet sides, mark them as a pair and confirm that the channels mirror each other. A test cut on scrap should confirm the final width and depth before the project pieces are machined.
Cutting a Dado Joint with a Router
A router is a flexible tool for dado joint woodworking. A straight bit suits many jobs, while a suitable spiral bit can also be used. The router may follow a clamped straightedge, edge guide, guide rail, or dado joint jig. Bosch and Festool both provide guide systems intended to direct routers along controlled straight cuts.
Account for the distance between the cutter and the guide surface. Do not assume the router base is perfectly centered around the bit. Make a test cut on scrap, measure the channel, and adjust the guide before cutting a finished project part.
For a deeper dado, remove the waste in several shallow passes rather than forcing the full depth at once. Keep the router base flat, allow the motor to reach operating speed, and feed the tool steadily. Always follow the router and cutter manufacturers’ limits for bit size, speed, feed direction, and cutting depth.
An exact-width bit can make the channel in one pass, but common bit sizes do not always match the actual thickness of plywood. A narrower bit can make two guided passes instead. Exact-width jigs use the real shelf or divider to set the opening, helping the finished dado match the material.
For a stopped dado, mark the starting and stopping points clearly. After routing, remove the dust, check the bottom for ridges, and test the mating board without glue.
Using a Table Saw, Hand Tools, and a Dado Joint Jig
A stacked dado set uses two outer blades with chippers and shims between them to create a wider cut. It can produce repeated through dadoes efficiently, but the set must be compatible with the table saw. Check the owner’s manual for the permitted diameter and width, arbor capacity, throat insert, and required accessories. Not every table saw accepts a dado set; for example, SawStop states that its Compact Table Saw does not support dado blades.
A standard table-saw blade can make the same basic recess through repeated passes. Cut the two boundaries, then shift the work slightly to remove the waste between them. Small ridges may need cleanup. Support cross-grain work with a proper miter gauge, crosscut sled, or approved jig rather than using the rip fence as the only guide.
Hand tools are also effective. Mark the shoulders with a knife, saw the walls, remove most of the waste with a sharp chisel, and level the bottom with a router plane. A router plane is especially useful for bringing the entire dado to an even depth.
A dado joint jig helps a router make straight, repeatable channels. A basic jig may use one fence placed at the correct offset. An exact-width version uses two guides set around the mating board. In either case, clamp the jig securely and measure from a consistent reference edge.
Disconnect power before changing blades, bits, inserts, or setup parts. Support large workpieces and use suitable eye, hearing, and dust protection. Follow the tool manufacturer’s instructions. OSHA notes that when a normal guard cannot be used for operations such as dadoing or rabbeting, suitable jigs, combs, or featherboards should be provided to help hold the stock.
Achieving a Clean Fit and Avoiding Common Mistakes
A good dado should slide together with firm hand pressure. It should not rattle, but it should not require hammer blows or extreme clamp force. Test it with the same material used in the project because sheet thickness can vary.
Make trial cuts to confirm the width, depth, position, and squareness. For repeated dadoes, keep the machine or jig setup unchanged and label each workpiece so its front, back, inside, and outside faces remain clear.
Tear-out often occurs where a cutter exits across the grain or breaks through thin veneer. Sharp cutters, a backing board, clean knife lines, controlled feed, and light finishing passes can reduce damage.
Check the dado bottom for ridges. A shelf resting on high spots can rock even when the width is correct. A router plane, chisel, or careful cleanup pass can flatten the recess. Also confirm that the channel is square to the reference edge.
Dry-fit the entire assembly before adding glue. Check the diagonals or use a reliable square, confirm shelf positions, inspect visible edges, and make sure stopped joints close fully. Plan the clamping order before glue reduces the available working time.
Conclusion
A dado joint is simple but valuable. Its three-sided channel supports shelves and partitions, controls their position, and helps furniture or cabinet assemblies remain square. Through dadoes are easy and efficient, stopped dadoes hide the connection, and rabbet-and-dado joints provide an added shoulder for alignment.
Choose the type and cutting method according to the project, material, load, tools, and desired appearance. Whether using a router, compatible table-saw setup, or hand tools, measure the actual material, work from consistent reference edges, make a test cut, and dry-fit the assembly before applying glue.
Frequently Asked Questions
What Is A Dado Joint Used For?
A dado joint is commonly used to support fixed shelves, cabinet dividers, furniture partitions, and drawer components. Its recessed shape improves alignment and helps resist downward pressure and sideways movement.
How Deep Should A Dado Joint Be?
The correct depth depends on the board thickness, material, expected load, and project design. It should be deep enough to support the mating piece without unnecessarily weakening the receiving board.
Can You Cut A Dado Joint With A Router?
Yes. A router fitted with a straight or spiral bit can cut accurate dadoes. Use a straightedge or dado jig, make shallow passes, and test the setup on scrap wood first.
What Is The Difference Between A Dado And A Groove?
A dado is traditionally cut across the grain of a board, while a groove runs parallel to the grain. Both are three-sided channels used to hold another piece or panel.
Should A Dado Joint Fit Tightly?
A dado should have a snug, smooth fit. The mating board should slide into the channel with firm hand pressure, without noticeable movement, hammering, or excessive clamping force.
Disclaimer: This article provides general woodworking information for educational purposes. Tool capabilities, materials, and safe operating procedures may vary. Always follow the manufacturer’s instructions, wear suitable protective equipment, disconnect power before adjustments, and use properly supported workpieces. Consult an experienced woodworker or qualified professional when you are unsure about a cutting method, structural design, or tool setup.
Thanks for visiting Clearise Cleaning Services! Discover more helpful tips and expert cleaning insights by exploring our related categories.