Garage door sensors are small safety devices that help your garage door close safely. They are usually installed near the bottom of both garage door tracks. Their job is simple: they check whether anything is in the path of the closing door. If a person, pet, tool, box, or vehicle blocks the sensor beam, the door should stop or reverse instead of closing.
When these sensors are not lined up correctly, the garage door may act like something is blocking it, even when the doorway is clear. This is why properly aligned sensors are important for smooth and safe garage door operation. A small shift in the sensor bracket can cause the door to start closing and then reverse. You may also notice blinking sensor lights, lights that turn off, a door that only closes when you hold the wall button, or an opener light that flashes after the door refuses to close.
Learning how to align garage door sensors can save time, reduce frustration, and help you avoid replacing parts too early. In most cases, this is a simple do-it-yourself task that only takes a few careful adjustments. This guide explains how the sensors work, how to read the lights, how to align them step by step, and what to check on LiftMaster, Chamberlain, Craftsman, Genie, and MyQ-connected garage door systems.
Quick Guide Table
| Step | What to Do | Why It Matters |
| 1 | Clear the garage door path | Any object can block the sensor beam |
| 2 | Clean both sensor lenses | Dirt, dust, or cobwebs can stop the signal |
| 3 | Check sensor height | Both sensors must face each other evenly |
| 4 | Loosen the wing nut or screw | This lets you adjust the sensor position |
| 5 | Aim the receiving sensor | The receiving sensor must catch the beam clearly |
| 6 | Wait for solid lights | Solid lights usually mean proper alignment |
| 7 | Tighten the bracket carefully | The sensor should not move after adjustment |
| 8 | Test the garage door | Confirms the door closes safely and fully |
What Garage Door Sensors Do
Garage door sensors are safety devices placed close to the floor, usually on each side of the garage door opening. One sensor sends an invisible beam across the doorway, and the other sensor receives that beam. When the beam is clear, the opener understands that it is safe for the garage door to close.
If the beam is blocked, dirty, or not lined up correctly, the opener may stop the door from closing. This is a safety feature, not just a mechanical problem. It helps protect children, pets, vehicles, stored items, and anyone walking under the door. Without working sensors, a garage door could close on something in its path and cause injury or damage.
Because the sensors sit low to the ground, they can easily get bumped by bikes, trash cans, tools, lawn equipment, or storage boxes. Dust, cobwebs, water, and sunlight can also affect them. That is why sensor alignment is one of the first things to check when a garage door will not close properly.
Signs Your Garage Door Sensors Are Out of Alignment
A misaligned garage door sensor often causes clear warning signs. The most common sign is a garage door that starts to close but reverses before touching the ground. This happens because the opener thinks something is blocking the doorway.
Another common sign is that the garage door refuses to close with the remote. In many cases, the door may still close if you press and hold the wall control button. This does not always mean the remote is bad. It often means the opener is bypassing the normal sensor check while you hold the wall button.
You may also see one or both sensor lights blinking, dim, or completely off. The opener motor may run, but the door may not finish the closing cycle. Some openers also flash their main light after the door reverses. When these signs appear together, sensor alignment should be one of the first things you inspect.
Tools and Safety Steps Before You Start
Garage door sensor alignment is usually a simple DIY task, but you should still work carefully. You do not need many tools. A microfiber cloth, screwdriver, measuring tape, level, flashlight, and work gloves are usually enough for most basic adjustments.
Before you begin, keep children and pets away from the garage door area. Do not place your hands near moving door parts, rollers, springs, or cables. Avoid forcing the garage door closed, because that can hide the real problem and may create a safety risk. If you check the sensor wiring, handle it gently and do not pull hard on the wires.
It is also helpful to keep the garage door fully open while you inspect the sensors. This gives you a clear view of both sides and reduces the chance of the door moving unexpectedly while you are adjusting the brackets.
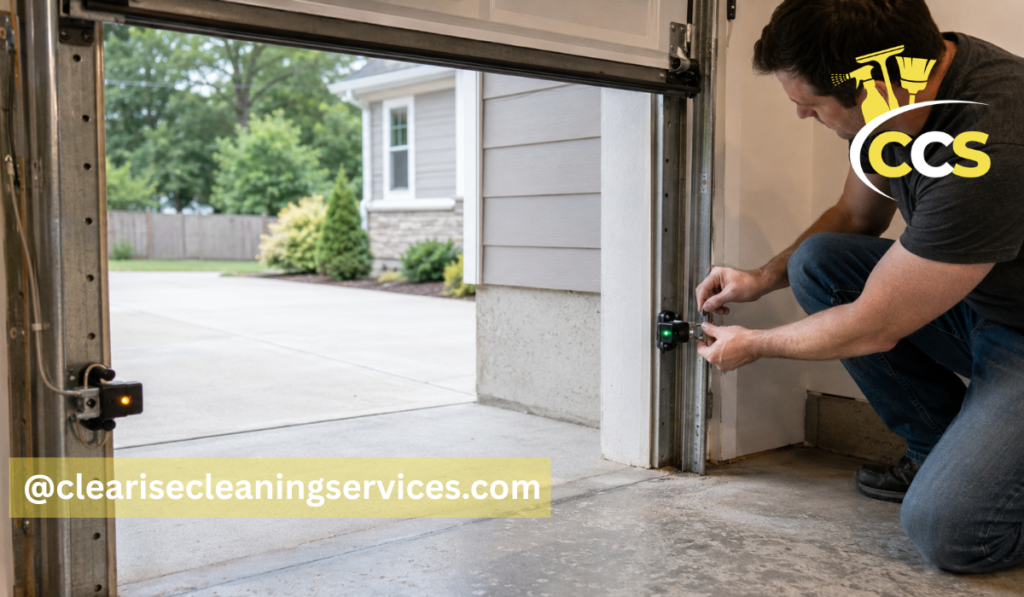
How to Align Garage Door Sensors Step by Step
Start by clearing the garage door opening. Remove boxes, tools, leaves, bikes, or anything else that may block the sensor beam. Even a small item near the sensor path can stop the door from closing.
Next, clean both sensor lenses with a soft microfiber cloth. Dirt, dust, cobwebs, and moisture can make the sensors act like they are misaligned. After cleaning, check that both sensors are mounted at the same height. Most safety sensors are placed a few inches above the floor, and both sides should face each other directly.
Now loosen the wing nut or screw on the adjustable sensor bracket. Do not remove it completely. Loosen it just enough so the sensor can move. Point the receiving sensor directly toward the sending sensor. Move it slowly up, down, left, or right until the indicator light becomes solid.
Once the light is steady, tighten the wing nut or screw carefully. This step matters because the sensor can shift while you tighten it. Hold the sensor in place with one hand and tighten the hardware slowly with the other. After that, test the garage door with both the wall button and the remote. If the door still reverses, repeat small adjustments until both sensor lights stay stable and the door closes normally.
Understanding Garage Door Sensor Light Colors
Garage door sensor light colors can vary by brand and model, so it is always smart to check your opener manual. Still, many systems follow a similar pattern. A solid light usually means the sensor has power and is lined up correctly. A blinking light often means the sensor is out of alignment, the beam is blocked, or there is a wiring problem. No light may point to no power, damaged wiring, or a failed sensor.
Many LiftMaster, Chamberlain, and some Craftsman systems use an amber or yellow light on the sending sensor and a green light on the receiving sensor. The amber light often shows that the sending sensor has power. The green light usually shows that the receiving sensor is getting the beam. If the green light is blinking, dim, or off, alignment is often the issue.
The simple rule is this: both sensors should have steady indicator lights based on your opener model. If one light keeps blinking after cleaning and adjustment, look for blocked paths, loose wires, sunlight glare, or a damaged bracket.
Garage Door Sensor Alignment Do It Yourself Tips
Garage door sensor alignment do it yourself work is safe for many homeowners when the issue is simple. If the sensor has been bumped, the lenses are dirty, or the bracket is slightly loose, you can usually fix the problem without replacing parts.
Make small adjustments instead of large movements. A sensor may only need a tiny shift to regain the beam. Tighten brackets slowly so the sensor does not move again. Use a level if the sensor looks tilted, and check that the brackets are not bent. Also remove cobwebs, dust, leaves, and moisture from the lens area.
Do not assume the sensor is broken before checking alignment. Many garage door problems look serious at first, but the real cause is a dirty lens, a blocked beam, or a loose bracket. Careful DIY alignment can often solve the problem without extra cost.
How to Align Garage Door Sensors on LiftMaster Openers
Many LiftMaster openers use safety reversing sensors with small indicator lights. On many models, one sensor shows an amber or yellow light, while the other shows a green light. The green receiving sensor is especially important because it confirms that the beam is being received.
If the green light is blinking or off, first clean both lenses and clear the doorway. Then check the height of both sensors and make sure they face each other. Loosen the receiving sensor bracket and aim it slowly until the green light becomes steady. Once the light is solid, tighten the bracket carefully and test the door.
For anyone searching how to align garage door sensors LiftMaster, the main point is to focus on the receiving sensor light. If it becomes steady and stays steady while the door closes, the alignment is likely correct.
How to Align Garage Door Sensors on Chamberlain Openers
Chamberlain garage door sensors are often similar to LiftMaster sensors because many opener designs are related. The system may show flashing opener lights, a reversing door, or blinking sensor lights when the sensors are blocked or out of line.
Start by checking the beam path. Remove anything that sits between the sensors. Clean the lenses and look for loose brackets. Adjust the sensor bracket carefully until both sensor lights are solid. Do not test the door before the lights are stable, because the opener may continue to reverse.
If your Chamberlain opener is connected to MyQ, you may also see an app alert when the door fails to close. This does not always mean the smart system is broken. The physical safety sensors should still be checked first.
How to Align Garage Door Sensors on Craftsman Openers
Craftsman garage door openers may use different sensor light patterns depending on the age and model. Many older Craftsman systems use an amber sending sensor and a green receiving sensor, but you should still check the owner’s manual if the lights look different.
Older systems may also have worn brackets, loose screws, or weak sensor wiring. Inspect the brackets first. If a bracket moves when you touch it, it may not hold the sensor in the right position. Make sure both sensors face each other directly across the doorway.
Loosen the hardware, adjust the sensor until the light stays solid, and then tighten the wing nut carefully. After alignment, test the door several times. If the lights stay steady and the door closes fully, the adjustment is working.
How to Align Garage Door Sensors on Genie Openers
Genie garage door sensors may use red, green, or other indicator lights depending on the model. On many Genie Safe-T-Beam systems, the sensors should face each other clearly, and the lights should stay solid when the beam is aligned.
If the lights blink or turn off, clean the lenses before moving the sensors. Then loosen the bracket and move the sensor slowly. Stop adjusting when the light becomes stable. Tighten the bracket without twisting the sensor out of place.
For Genie openers, the process is still similar to other brands. The exact light colors may be different, but the goal is the same: both sensors need power, a clear path, and direct alignment across the garage door opening.
How to Align Garage Door Sensors with MyQ Systems
MyQ is a smart garage system, but it does not replace the physical safety sensors. If your garage door fails to close and the MyQ app shows an alert, the first step is still to check the sensors near the bottom of the door tracks.
Confirm that the physical sensors are aligned and that nothing is blocking the beam. Then check whether the door closes from the wall control. Review any MyQ app warnings, but do not assume the app is the main problem. The opener, sensor lights, and door movement should be checked first.
If the sensors are aligned and the door works from the wall button, then you can refresh the app, check the Wi-Fi connection, or reconnect the opener if needed. For most closing problems, the sensor alignment should be handled before troubleshooting the smart features.
Common Mistakes When Aligning Garage Door Sensors
One common mistake is moving both sensors too much at the same time. This can make it harder to find the correct position. It is usually better to adjust one sensor slowly while watching the light.
Another mistake is tightening the bracket too hard and shifting the sensor again. The light may become solid during adjustment, but if the sensor moves while tightening, the problem returns. Dirty lenses are also easy to overlook. A clean lens can make a big difference.
Some people forget to check sensor height or ignore a bent bracket. Others assume the sensor is bad before checking for sunlight glare or loose wiring. Testing the door before both lights are stable can also lead to confusion. Take your time and make small changes.
Why Garage Door Sensors Still Blink After Alignment
Blinking lights can still happen after basic alignment. If this happens, the sensor may not be the only issue. A loose wire connection, damaged sensor wire, direct sunlight, bent bracket, dirty lens, scratched lens, faulty sensor, or power issue with the opener can all cause blinking lights.
Start with the easiest checks first. Clean the lenses again, confirm the beam path is clear, and gently inspect the wires near each sensor. Look for loose connections, broken insulation, or wires that may have been pulled or damaged.
If the sensor light changes when you move the wire, there may be a wiring issue. If the light only blinks at certain times of day, sunlight may be interfering with the receiving sensor. This section helps you know what to check next before replacing the sensors.
How to Fix Sunlight Glare on Garage Door Sensors
Direct sunlight can sometimes shine into the receiving sensor and make it hard for the sensor to read the beam. A common sign is a door that works in the evening but not during bright daylight. You may also notice that the sensor light changes when sunlight hits the lens.
A simple fix is to add a small sensor shield that blocks direct sunlight without blocking the beam. You can also adjust the sensor angle slightly, but do this carefully so the sensors still face each other. Keep the lens clean and dry, because moisture and dirt can make glare problems worse.
Some systems may allow the sensor positions to be swapped, but this depends on the model and wiring. If wiring changes are needed, it is better to call a technician instead of guessing.
When Sensor Alignment Is Not the Real Problem
Sometimes a garage door problem is not caused by sensor alignment. If the sensors are clean, aligned, and showing steady lights, but the door still will not close, another part may be causing the issue.
Possible causes include a broken spring, damaged track, weak opener motor, bad logic board, damaged sensor wire, faulty wall button, or remote control problem. A door that closes unevenly, shakes badly, or makes loud grinding sounds may have a mechanical problem instead of a sensor problem.
Sensor alignment is a smart first step, but it is not the only possible answer. If the door still fails after proper alignment, deeper troubleshooting may be needed.
When to Call a Garage Door Professional
DIY alignment is fine for simple sensor problems, but some issues need professional help. Call a garage door professional if the wires are damaged or exposed, the sensors have no lights after checking power, or the door closes unevenly.
You should also get help if the door makes loud grinding sounds, the springs or cables look damaged, or the opener flashes error codes repeatedly. Garage door springs and cables are under high tension and can be dangerous to repair without proper training.
A professional can check the sensors, wiring, opener, tracks, and door balance safely. This is especially important if the problem keeps coming back after you align the sensors.
Quick Maintenance Tips to Keep Sensors Aligned
Once your sensors are working, a little maintenance can help prevent the same problem from returning. Wipe the lenses regularly with a soft cloth. Keep storage boxes, tools, bikes, and trash cans away from the sensor path.
Check the brackets after they are bumped by lawn equipment or garage items. Inspect the wires for wear or loose connections. Keep the garage floor area clean and dry, especially near the sensors.
It is also smart to test the auto-reverse safety feature monthly. If the door does not reverse when the beam is blocked, stop using the opener until the problem is fixed. Recheck sensor alignment after heavy vibration, door repairs, or any work near the tracks.
Conclusion
Learning how to align garage door sensors can often fix a garage door that will not close. In many cases, the solution is simple: clean the lenses, check the lights, adjust the receiving sensor, tighten the bracket, and test the door.
LiftMaster, Chamberlain, Craftsman, Genie, and MyQ systems may use different light colors or alerts, but the basic alignment process is usually similar. The sensors need a clear path, steady power, and direct aim across the garage door opening.
If the lights still blink or the door still reverses after careful alignment, the issue may involve wiring, sunlight glare, damaged sensors, or another garage door problem. Start with the simple checks, work carefully, and call a professional when the problem looks unsafe or difficult to fix.
FAQs
Why Does My Garage Door Reverse After Closing Halfway?
Your garage door may reverse because the sensors are misaligned, dirty, blocked, or affected by sunlight. The opener thinks something is in the door’s path and stops for safety.
What Color Should Garage Door Sensor Lights Be?
Sensor light colors depend on the opener brand. Many LiftMaster and Chamberlain models use amber or yellow on one sensor and green on the other. Both lights should usually stay solid.
Can I Align Garage Door Sensors Myself?
Yes, you can usually align garage door sensors yourself if the issue is simple. Clean the lenses, adjust the brackets slowly, and make sure both lights stay steady before testing.
Why Are My Garage Door Sensor Lights Still Blinking?
Blinking lights may mean poor alignment, dirty lenses, loose wiring, sunlight glare, a bent bracket, or a faulty sensor. Recheck the simple issues before replacing any parts.
Do Myq Garage Doors Still Need Sensor Alignment?
Yes, MyQ systems still use physical garage door safety sensors. If the app shows a closing error, check the sensor lights and alignment before troubleshooting the smart connection.
Disclaimer: This article is for general informational purposes only. Garage door systems can be dangerous if springs, cables, tracks, or wiring are damaged. If you are unsure or the problem seems unsafe, contact a qualified garage door technician.
Thanks for visiting Clearise Cleaning Services! Discover more helpful tips and expert cleaning insights by exploring our related categories.