How to remove wallpaper glue is one of the most important things to learn after stripping old wallpaper, especially if you want your walls to look smooth, clean, and ready for paint. Many people remove the wallpaper itself and think the hard part is over, but the leftover wallpaper glue, wallpaper paste, and sticky adhesive residue can be just as frustrating.
If you paint over leftover glue, the wall may look uneven, feel tacky, or develop problems like paint bubbling, paint peeling, poor adhesion, or rough patches. The good news is that wallpaper glue removal is usually a DIY-friendly project when you use the right tools, work in small sections, and avoid damaging the wall surface.
This guide explains how to remove wallpaper glue from walls step by step using hot water, dish soap, white vinegar, baking soda, fabric softener, a sponge, and a putty knife. You’ll also learn how to handle stubborn wallpaper adhesive, protect drywall, repair damaged areas, and prepare the wall for painting.
What Is Wallpaper Glue and Why Is It So Hard to Remove?
Wallpaper glue, also called wallpaper paste or wallpaper adhesive, is designed to hold wallpaper tightly to the wall for years. That is why it often stays behind even after the wallpaper has been removed. In older homes, the problem can be worse because old wallpaper glue may have hardened, built up in layers, or mixed with dust, paint, and paper backing.
The tricky part is that many wallpaper adhesives become sticky again when moisture touches them. This is called reactivated glue. When you apply water or cleaning solution, the glue softens, but it can also turn into a slippery, gooey mess if you do not wipe and rinse it properly.
Older adhesives may also leave glossy patches, tacky spots, or a rough texture on the wall. These areas may not look serious at first, but they can create problems later when you apply primer or paint. A wall may appear clean from a distance but still have hidden adhesive residue that affects the final finish.
That is why the goal is not just to scrape off visible glue. The goal is to create a smooth wall, a clean surface, and a truly paint-ready wall.
Can You Paint Over Wallpaper Glue?
You should not paint over wallpaper glue if you want a clean, long-lasting finish. Some people try to save time by priming or painting directly over leftover glue, but this often creates more work later.
When paint touches leftover wallpaper adhesive, the moisture in the paint can reactivate the glue. This may cause paint bubbling, paint peeling, cracking, chipping, yellow stains, or uneven texture. In some cases, the glue can bleed through the paint and leave brown or shiny marks on the wall.
Painting over glue can also stop the paint from bonding properly. This leads to poor paint adhesion, which means the paint may not stick well to the wall surface. Even if the wall looks fine right after painting, problems can appear after the paint dries.
So, do you need to remove all wallpaper glue before painting? Ideally, yes. The wall should feel smooth, dry, and clean. It should not feel sticky, slick, glossy, or rough. If you want a professional-looking result, removing the glue first is always the safer choice.
Tools and Supplies You’ll Need
Before you start removing wallpaper glue, gather everything you need. Having the right supplies makes the process faster and helps prevent wall damage.
| Tool or Supply | Why You Need It |
| Drop cloths or plastic tarps | Protect floors and furniture |
| Painter’s tape | Covers trim, outlets, and switches |
| Bucket or spray bottle | Holds your cleaning solution |
| Hot water or warm water | Softens wallpaper paste |
| Liquid dish soap | Helps break down sticky residue |
| White vinegar | Loosens stubborn adhesive |
| Baking soda | Adds mild scrubbing power |
| Fabric softener | Helps soften old wallpaper paste |
| Sponge or scrubby sponge | Applies solution and wipes glue |
| Clean cloths or microfiber cloths | Rinse and dry the wall |
| Putty knife or wallpaper scraper | Scrapes softened glue |
| Fine-grit sandpaper or sanding sponge | Smooths dry residue |
| Rubber gloves and goggles | Protect your skin and eyes |
| Fan | Helps air out the room and dry walls |
| Primer | Prepares the wall for paint |
A plastic putty knife or flexible wallpaper scraper is often safer for drywall than a sharp metal scraper. If you use a metal tool, keep it flat against the wall and use gentle pressure.
Safety Steps Before You Start
Wallpaper glue removal uses water, scraping, and sometimes chemical remover, so safety matters. First, protect the room. Move furniture away from the walls and cover the floor with drop cloths, plastic tarps, or plastic sheeting. Use painter’s tape around trim, outlets, and light switches.
Because you will be applying wet solution to the wall, be careful around electrical outlets and switches. If you are working close to outlets, turn off power to that area at the breaker box. Do not spray water directly into outlets, vents, or switches.
Good ventilation is also important. Open windows and use a fan to improve air circulation, especially if you use a commercial wallpaper remover, gel remover, or chemical stripper. Wear rubber gloves, goggles, and a respirator if sanding or working with strong products.
If your home was built before 1978, be extra careful. A pre-1978 house may contain lead-based paint under wallpaper layers. Avoid sanding old paint unless you have tested for lead. If you suspect asbestos, mold, or unsafe old materials, stop and contact a professional.
How to Remove Wallpaper Glue Step by Step
The best way to remove wallpaper glue from walls is to soften it first, scrape gently, rinse thoroughly, and let the wall dry completely. Work slowly and do not rush the scraping stage.
Step 1: Protect the Room
Cover the floor and nearby furniture before you begin. Wallpaper glue can drip, and old adhesive can become messy when it softens. Use drop cloths, painter’s tape, and trash bags to keep the room clean.
Pay close attention to outlets, switches, baseboards, and trim. The cleaner your setup is, the easier the final cleanup will be.
Step 2: Mix a Homemade Wallpaper Glue Remover
A simple homemade wallpaper glue remover works well for many walls. Start with a bucket of hot water and add a few drops of liquid dish soap. For stronger residue, mix in a small amount of white vinegar or baking soda.
You can also use warm water with fabric softener for old wallpaper paste. This helps soften the adhesive so it can be scraped away more easily.
A basic DIY solution looks like this:
| Solution | Best For |
| Hot water + dish soap | Light glue residue |
| Hot water + white vinegar | Sticky adhesive |
| Hot water + baking soda | Paste-like buildup |
| Water + fabric softener | Old wallpaper paste |
| Commercial remover | Stubborn glue residue |
Start with the mildest option first. If the glue does not soften, move to a stronger mixture.
Step 3: Apply the Solution in Small Sections
Dip a sponge into the cleaning solution or fill a spray bottle. Apply the solution to a small area of the wall, about two to three feet wide. Do not soak the entire wall at once because the glue may dry again before you scrape it.
Working in small sections gives you more control. It also helps protect drywall from too much moisture. The goal is to soften the glue, not flood the wall.
Step 4: Let the Glue Soften
Let the solution sit for several minutes so it can break down the glue residue. You should notice the wall becoming slightly tacky or slippery as the adhesive rehydrates.
If the glue is thick, old, or stubborn, you may need to apply more solution and wait a little longer. Be patient. The softer the glue becomes, the less scraping force you will need.
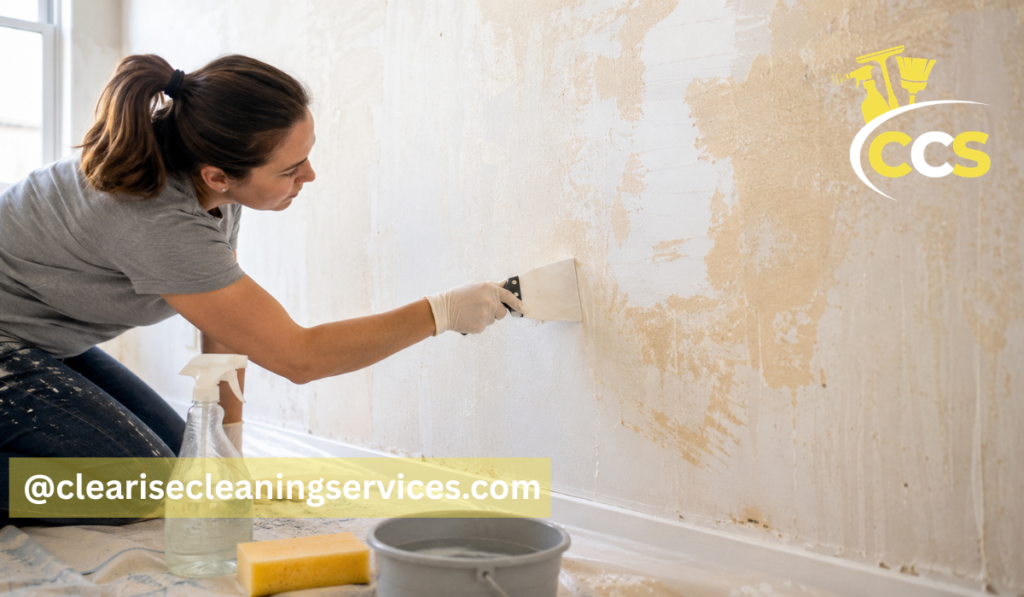
Step 5: Scrape the Glue Gently
Use a putty knife, plastic scraper, or wallpaper scraper to remove the softened glue. Keep the blade flat against the wall and push gently. Do not dig into the surface.
If you are working on drywall, be especially careful. Too much pressure can tear the drywall paper or create gouges. If the glue does not come off easily, apply more solution instead of scraping harder.
Step 6: Wipe, Rinse, and Repeat
After scraping, wipe the wall with a damp cloth or sponge. Then rinse the area with clean water to remove leftover cleaning solution and adhesive residue.
This step is important because soap, vinegar, and softened glue can leave a film behind. You may need a second round of cleaning if the wall still feels sticky. Continue until the wall feels clean and smooth.
Step 7: Let the Wall Dry Completely
Once the glue is removed, let the wall dry fully. Use a fan, open windows, and allow good air circulation. Do not rush into priming or painting while the wall is still damp.
Drying time depends on the room, wall type, humidity, and how much water you used. A dry wall should feel cool but not damp, smooth but not sticky, and clean with no glossy patches.
Best Homemade Solutions for Removing Wallpaper Glue
Many people prefer a homemade solution before buying a commercial remover. For light to medium wallpaper paste, DIY methods often work well.
Hot water and dish soap is the easiest starting point. The hot water softens the paste, while dish soap helps lift the sticky residue from the wall surface.
White vinegar and hot water can help with stubborn adhesive. Vinegar is often used because it cuts through residue and helps loosen glue. It may smell strong, so keep the room ventilated.
Baking soda and hot water can help when the glue has a paste-like texture. Baking soda gives the mixture mild cleaning power without being too harsh.
Fabric softener and water is another common DIY method for old wallpaper paste. It can help soften adhesive, especially if the glue has dried hard.
A good rule of thumb: start mild, test a hidden area, and only increase strength if the glue does not soften.
Always rinse the wall with clean water after using any homemade mixture. Even natural cleaners can leave residue that affects primer or paint.
How to Remove Stubborn or Old Wallpaper Glue
Old adhesive can be difficult because it may have been on the wall for years. If regular hot water does not work, try repeated soaking. Apply the solution, wait, scrape gently, wipe, and repeat.
For very stubborn glue, a commercial wallpaper glue remover or commercial wallpaper stripper may help. These products are designed to break down adhesive faster than homemade mixtures. Follow the product instructions carefully, wear gloves, and ventilate the room.
A wallpaper steamer may also help with thick old paste, but be careful on drywall. Too much steam can soften drywall paper or cause surface damage. Plaster walls can usually handle moisture better than drywall, but you should still test first.
If small patches remain after the wall dries, use fine-grit sandpaper or a sanding sponge to smooth the surface. Sanding should be a finishing step, not the main removal method. Never sand wet glue because it will smear instead of smoothing out.
How to Remove Wallpaper Glue Without Damaging Drywall
Drywall is more delicate than plaster, so you need a gentle approach. The biggest mistake is over-soaking the wall. Too much water can soften the drywall paper and make it easier to tear.
To remove wallpaper glue from drywall, use a damp sponge instead of pouring or spraying too much water. Work in small sections and give the solution time to soften the glue. Use a plastic putty knife or flexible scraper, and keep the blade flat.
If the drywall paper starts to peel, stop scraping. Let the wall dry, then repair the damaged area later with a problem surface sealer or primer designed for torn drywall paper.
Avoid aggressive sanding unless you are sure the wall is safe and dry. Sanding too much can create dust, damage the surface, and make patching harder.
The safest method is simple: soften, scrape gently, rinse, dry, inspect, and repair only where needed.
Removing Wallpaper Glue from Plaster, Painted, or Textured Walls
Different wall surfaces need slightly different care. Plaster walls are usually harder and can often handle more moisture than drywall. Still, you should avoid soaking the wall for too long because old plaster can crack or absorb water in weak spots.
Painted walls need caution because the cleaning solution may soften or dull the paint. Always test a hidden area first. If the paint starts lifting, switch to a gentler method.
Textured walls can be more difficult because glue can sit inside the texture. Use a sponge, soft brush, and patience. Avoid sharp scraping because it can flatten or damage the texture.
For bathroom or kitchen walls, watch for moisture problems. If you see mold behind wallpaper, mildew, brown stains, or water damage, do not simply clean and paint over it. Fix the moisture issue first.
How to Know If Wallpaper Glue Is Completely Removed
A wall can look clean but still have glue on it. Before painting, inspect the surface carefully.
Use the touch test first. Run your hand across the wall. It should feel smooth, not sticky or slick. If it feels tacky, more glue remains.
Use the fingernail test on suspicious areas. Lightly scratch the surface with your fingernail. If you feel gummy residue or see glue lift, clean that area again.
Use the flashlight test by shining a light across the wall at an angle. Glossy patches, shiny streaks, or uneven spots may mean adhesive residue is still present.
You can also wipe a small area with a damp sponge. If it becomes slimy or sticky again, the glue has not been fully removed.
A clean wall should be dull, dry, smooth, and residue-free.
What to Do If the Wall Is Still Sticky After Cleaning
If the wall is still sticky after removing wallpaper glue, do not panic. This usually means the adhesive was not fully removed or the wall was not rinsed well enough.
Apply warm water and dish soap again to the sticky area. Let it sit for a few minutes, then scrape gently and rinse with clean water. If that does not work, try vinegar and hot water or a commercial remover.
Sometimes the cleaning solution dries too quickly, especially in a warm room. Work in smaller sections so the glue stays soft while you scrape.
If the wall feels sticky only in a few spots, focus on those areas instead of washing the entire wall again. Repeat the process until the wall feels clean. Then let it dry completely before sanding, patching, or priming.
Should You Sand Wallpaper Glue Off?
You can sand some leftover wallpaper glue, but sanding should not be your first method. Wet cleaning is usually better because it softens and removes the adhesive instead of turning it into dust.
Sanding dry glue can help smooth rough patches after most of the adhesive is gone. Use fine-grit sandpaper or a sanding sponge and apply light pressure. A 100-grit sanding sponge may work for rough spots, but finer grit is often better for finishing.
Do not sand wet glue. It will smear across the wall and make the surface worse. Also, do not sand old paint without checking for lead, especially in a pre-1978 house.
Wear a respirator or dust mask when sanding, and clean the wall afterward with a damp cloth or vacuum. Dust left on the wall can stop primer from sticking properly.
Repairing Walls After Wallpaper Glue Removal
After glue removal, you may notice gouges, torn drywall paper, dents, or rough patches. This is normal, especially if the wallpaper was old or the adhesive was stubborn.
If drywall paper is torn, seal it before patching. A problem surface sealer or primer can help lock down damaged paper so it does not bubble when joint compound or paint is applied.
For small dents and gouges, use spackle or joint compound. Apply a thin layer, let it dry, then sand it smooth. For larger rough areas, you may need a light skim coat to even out the wall.
After sanding, remove all sanding dust with a clean cloth. The wall should feel smooth before primer. This repair stage is important because paint will not hide wall damage. In fact, paint often makes bumps, scratches, and rough patches more visible.
Priming and Painting After Wallpaper Glue Removal
Once the wall is clean, dry, and repaired, primer is the next step. Primer helps seal the surface and creates better paint adhesion.
If the wall is in good shape, a quality wall primer may be enough. If there are stains, torn paper, or possible glue residue, consider a stain-blocking primer, shellac primer, oil-based primer, or bonding primer. Products like Zinsser 1-2-3 Primer are commonly used for problem surfaces, but always choose a primer based on the wall condition.
Can you prime over wallpaper glue? It is better to remove the glue first. Primer can help seal small traces of residue, but it should not be used as a shortcut over thick adhesive.
Apply the first coat of primer and watch for bubbles. If primer bubbles appear, leftover glue, moisture, or damaged drywall paper may still be present. Let the area dry, repair it, and prime again before painting.
Homemade Remover vs Commercial Remover vs Wallpaper Steamer
Different methods work for different situations.
| Method | Best For | Pros | Cons |
| Homemade solution | Light to medium glue | Cheap and easy | May need repeat cleaning |
| Commercial remover | Stubborn adhesive | Stronger results | Needs ventilation and PPE |
| Wallpaper steamer | Thick old paste | Softens heavy glue | Can damage drywall if overused |
| Sanding | Final smoothing | Helps rough spots | Creates dust and can damage walls |
For most DIY projects, start with a homemade remover. If the glue is old, thick, or sticky after repeated cleaning, move to a commercial wallpaper remover. Use a steamer carefully and only when needed.
If the room has major wall damage, mold, water stains, or suspected lead paint, professional help may be safer.
Common Mistakes to Avoid When Removing Wallpaper Glue
One of the biggest mistakes is painting too soon. If glue remains, paint may bubble, peel, or look uneven.
Another mistake is using too much water on drywall. Over-soaking can damage drywall paper and create more repair work. Scraping too hard is also risky. If the glue does not come off, soften it again instead of forcing it.
Skipping the rinse step is another common problem. Soap, vinegar, baking soda, and glue residue can leave a film behind. Always wipe with clean water after scraping.
Do not sand wet glue, ignore sticky patches, or prime before the wall is dry. Also, avoid sanding old paint until you know it is safe. These small precautions can prevent major paint failure later.
When to Call a Professional
Most people can handle wallpaper glue removal as a DIY project, but there are times when calling a professional is smart.
Contact a painter, contractor, or professional wallpaper installer if the wall has severe damage, large areas of torn drywall paper, mold, mildew, water damage, or suspected asbestos. You should also get help if the home may have lead paint and sanding is required.
A professional may also be worth it for high ceilings, large rooms, textured walls, or full-room skim coating. DIY removal saves money, but professional repair can save time when the wall is badly damaged.
Quick Final Checklist Before Painting
Before painting, check the wall carefully. It should be smooth, clean, dry, and free of sticky residue.
Use this quick checklist:
- The wall does not feel sticky or slick
- No glossy glue patches remain
- The wall is fully dry
- Torn drywall paper is sealed
- Gouges and dents are patched
- Sanding dust is removed
- Primer goes on smoothly
- No primer bubbles appear
If the wall passes these checks, it is ready for primer and paint.
Conclusion
Learning how to remove wallpaper glue properly can save you from paint problems, rough walls, and extra repairs later. The process is simple: soften the wallpaper glue, scrape gently, rinse well, let the wall dry, inspect for sticky residue, repair damaged areas, and apply the right primer.
Whether you use hot water and dish soap, vinegar, baking soda, fabric softener, or a commercial wallpaper remover, patience is the key. Work in small sections and avoid aggressive scraping, especially on drywall. Once the wall is smooth, clean, dry, and glue-free, you can move forward with primer and paint confidently.
Frequently Asked Questions
What Is The Easiest Way To Remove Wallpaper Glue?
The easiest way is to soften the glue with hot water and dish soap, let it sit for a few minutes, then scrape gently with a putty knife and wipe with a clean sponge.
Does Vinegar Remove Wallpaper Glue?
Yes, white vinegar can help loosen wallpaper glue. Mix it with hot water, apply it to the wall, let it soften the adhesive, then scrape and rinse.
Can I Use Fabric Softener To Remove Wallpaper Glue?
Yes, fabric softener mixed with warm water can help soften old wallpaper paste. It works best when the glue is dry, thick, or stubborn.
Do I Need To Remove Every Bit Of Wallpaper Glue Before Painting?
Yes, you should remove as much glue as possible. Leftover adhesive can cause paint bubbling, peeling, stains, and poor adhesion.
How Long Should Walls Dry After Removing Wallpaper Glue?
Walls should be completely dry before priming or painting. Drying time depends on humidity, ventilation, and wall type, but the wall should not feel damp, sticky, or cool with moisture.
What If Wallpaper Glue Bleeds Through Paint?
If glue bleeds through paint, stop painting. Let the wall dry, clean the area again, sand lightly if needed, and apply a stain-blocking primer before repainting.
Is Wallpaper Glue Toxic?
Most wallpaper glue residue is not a major concern during normal cleaning, but old walls may hide lead paint, mold, or other hazards. Use gloves, ventilation, and avoid sanding unknown old surfaces.
Can I Remove Wallpaper Glue From Plaster Walls The Same Way?
Yes, but plaster walls may handle moisture better than drywall. Still, test a hidden area first and avoid over-soaking weak or cracked plaster.
Disclaimer: This article is for general informational purposes only. Individual results, wall conditions, materials, preferences, and situations may vary, so use the guidance that best fits your specific project.
Thanks for visiting Clearise Cleaning Services! Discover more helpful tips and expert cleaning insights by exploring our related categories.