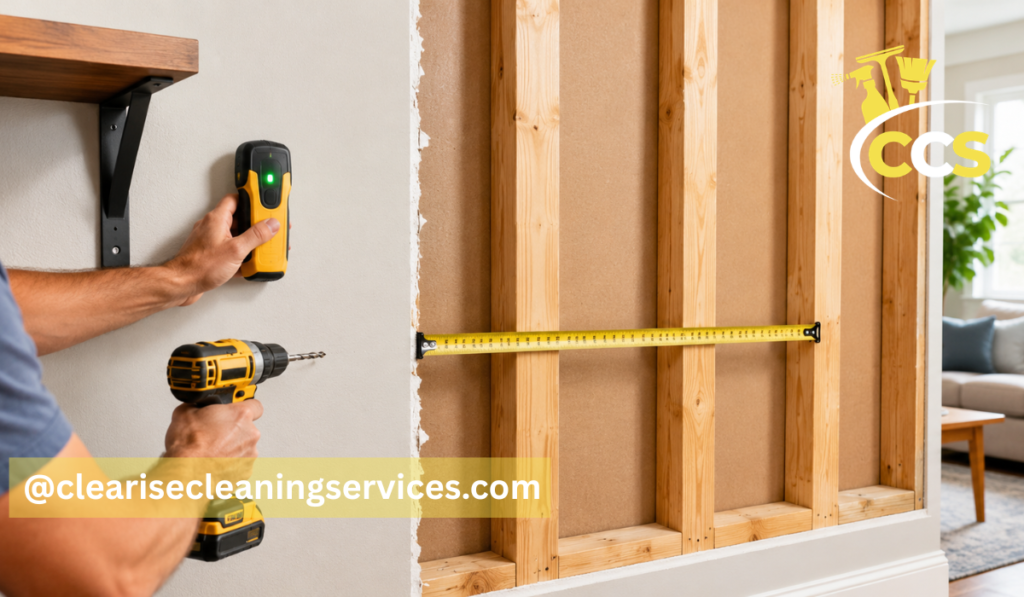
When you need to hang a television, install shelves, mount a heavy mirror, or begin a renovation, one of the first questions is often: how far apart are studs? In most conventionally framed homes in the United States, wall studs are commonly placed 16 inches apart on center. However, some walls use 24-inch spacing, and the layout may change near windows, doors, corners, plumbing, and repaired sections.
Knowing the likely spacing gives you a useful starting point, but it should never replace checking the wall itself. A standard pattern can be interrupted by extra framing, metal studs, old construction methods, or later remodeling. The wall covering also hides pipes and electrical wiring, so drilling only on the basis of a tape measurement can create problems.
This guide explains common stud spacing in houses, apartments, drywall walls, closets, older properties, and homes built during the 1970s. It also shows how to use a stud finder, how to locate framing without one, and why you should confirm the stud’s center before driving a screw.
Quick Guide to Wall Stud Spacing
| Wall or Building Type | Common Stud Spacing | Important Detail |
| Standard wood-framed wall | 16 inches on center | Most common starting measurement in U.S. homes |
| Some exterior 2×6 walls | 24 inches on center | Often used in approved energy-efficient framing systems |
| Drywall partition | 16 or 24 inches on center | Drywall is attached to wood or metal framing |
| Apartment wall | 16 or 24 inches on center | May contain wood studs, metal studs, or special soundproof walls |
| Old house | Irregular or around 16 inches | Repairs, plaster, and older lumber may change the pattern |
| Metric construction | 400 or 600 millimeters | Common equivalents to 16- and 24-inch spacing |
| Near doors or windows | Varies | Extra framing is normally added around openings |
| Closet wall | Usually 16 or 24 inches | Extra studs or blocking may support doors and shelves |
How Far Apart Are Studs in a Wall?
The most common answer is 16 inches on center, often written as 16 inches OC. This layout works well with standard building materials because many drywall and sheathing panels are made in widths that line up with regular framing. In a typical wood-framed wall, each panel edge can land on solid framing, making the wall easier to fasten and finish.
However, 16 inches is not the only possible measurement. Some approved wall systems use studs spaced 24 inches on center. The U.S. Department of Energy describes 2×6 exterior-wall framing at 24 inches on center as a common part of advanced framing, a method that reduces unnecessary lumber and creates more room for insulation.
In countries that use metric measurements, comparable spacing is often described as 400 millimeters or 600 millimeters on center. USG construction references show 16 inches as the practical equivalent of 400 millimeters and 24 inches as the equivalent of 600 millimeters.
These numbers are starting points, not guarantees. Before mounting anything heavy, confirm where the framing actually sits.
Understanding 16-Inch On-Center Measurements
“On center” means the measurement starts at the center of one stud and ends at the center of the next. It does not describe the empty space between the boards.
A modern 2×4 does not actually measure 2 inches by 4 inches after it has been dried and finished. Its usual actual width is about 1.5 inches. When studs are installed 16 inches on center, the clear space between their inside edges is therefore about 14.5 inches.
For example, imagine marking the center of one stud at zero inches. The center of the next stud should be close to 16 inches, followed by another near 32 inches, then 48 inches. This repeating pattern can help you search across a wall once you have positively located one stud.
The distinction matters because a person may tap on a wall, find what seems like a solid point, and then measure 16 inches from the stud’s edge rather than its center. That small mistake can place a screw near the edge of the next stud or miss it completely. Marking both edges and finding the midpoint is much more reliable.
When Studs Are Spaced 24 Inches Apart
Studs may be spaced 24 inches on center in some exterior walls, energy-efficient homes, non-load-bearing partitions, garages, basements, and other wall systems designed for wider framing. This layout is often linked with 2×6 studs rather than standard 2×4 studs.
The wider stud provides more cavity depth for insulation, while the wider spacing reduces the amount of wood running through the insulated wall. Because wood conducts heat more easily than most cavity insulation, using fewer studs can reduce thermal bridging. The Department of Energy identifies 2×6 framing at 24 inches on center as a central advanced-framing strategy and notes that it can lower material use while leaving more room for insulation.
That does not mean any existing wall can safely be rebuilt with wider spacing. Stud size, wall height, roof and floor loads, wind exposure, sheathing, drywall type, fire resistance, and local building requirements all affect what is allowed. A 24-inch layout must be part of a complete wall design rather than a material-saving shortcut.
When checking an unknown wall, test both common patterns. If a confirmed stud does not lead to another one 16 inches away, continue carefully toward 24 inches. Do not assume the wider distance until you have found several studs that follow the same pattern.
How Far Apart Are Studs in Drywall?
Drywall does not determine stud spacing by itself. It is a surface material fastened to wood or metal framing behind it. In many residential wall systems, that hidden framing is spaced either 16 or 24 inches on center. USG system documents include both 16-inch and 24-inch stud layouts for different wood- and steel-framed drywall assemblies.
Drywall can still provide clues. Panel edges usually need support, so a vertical seam may line up with a stud. Small dimples, filled screw heads, or nail patterns can also reveal the framing line, especially under side lighting. Moving a flashlight close to the wall may make these slight surface changes easier to see.
These clues are not always dependable. Joint compound and paint can hide fasteners, and drywall may be installed horizontally, causing many visible seams to run across studs instead of along them. Some walls also include resilient channels, furring strips, double drywall layers, or fire-rated assemblies that make the framing harder to locate.
Drywall thickness does not tell you the stud spacing, but it can affect how well a stud finder reads through the surface. Thick coverings, heavy texture, tile, foil-backed insulation, or several layers may reduce accuracy. Scan slowly and repeat the reading before drilling.
How Far Apart Are Studs in Apartments?
In many apartments, studs are still commonly arranged at 16 or 24 inches on center. However, apartment buildings can contain a wider variety of wall systems than a typical single-family home. One wall may use wood framing, another may use light-gauge steel studs, and a wall between separate units may be a thicker fire- or sound-rated assembly.
Interior partition walls may also contain staggered studs, resilient channels, multiple drywall layers, concrete, masonry, or a gap between separate frames. These details help manage sound and fire performance but can confuse a basic stud finder. A reading that seems unusually wide or doubled may be caused by the wall assembly rather than irregular workmanship.
Building age and renovation history matter as well. A newer apartment may have predictable metal framing, while an older unit may contain wood framing behind plaster. Converted buildings can include several construction methods within the same room.
Before installing anything heavy in an apartment, check the lease or ask building management about drilling rules. Confirm whether the wall separates units, borders a utility area, or contains plumbing. For a television mount, large cabinet, or heavy shelf, the correct fastener must match both the wall material and the type of stud.
How Far Apart Are Studs in Old Houses?
Stud spacing in old houses can be less predictable than in modern construction. Some older homes follow a regular pattern close to 16 inches on center, but others contain hand-cut or rough-sawn lumber, framing added at different times, and measurements that do not match today’s standard dimensions.
Plaster-and-lath walls create another challenge. Thin wood laths run horizontally across the studs and can make large areas of the wall feel solid when tapped. Some electronic stud finders also respond to the lath or metal mesh rather than the framing behind it.
Repairs can further change the layout. A wall may have been opened for plumbing, rewired, patched after damage, or partially rebuilt during an addition. Extra boards may have been installed as nailers or blocking, creating strong readings that do not continue vertically like a full stud.
For these reasons, do not find one solid point and assume every following stud is exactly 16 inches away. Check several locations at different heights and scan across a wider section of the wall. A strong, continuous vertical line is more likely to be a stud than a short patch of solid material.
How Far Apart Are Studs in a 1970s House?
In a U.S. house built during the 1970s, 16-inch-on-center framing is a sensible first place to look. Even so, the home’s age alone cannot confirm the layout. Some walls may use 24-inch spacing, especially where the original design allowed it, while interior partitions and exterior walls may not match each other.
A 1970s house has also had decades in which owners could remodel rooms, enlarge windows, close doorways, finish a basement, or add closets. A renovated section may use a different stud pattern from the original structure. Repairs around plumbing and electrical work can also introduce blocking or extra framing.
Begin with a stud finder and verify the result by locating both edges. Then measure 16 inches from the center and scan again. If that fails, check near 24 inches. Outlets, switches, baseboard fasteners, attic access, and unfinished basement walls may offer supporting clues, but none should be treated as final proof.
When an important installation depends on the result, such as a wall-mounted cabinet or handrail, consider using a small inspection hole in a hidden area or asking an experienced contractor to confirm the framing.
How Far Apart Are Studs From a Window?
The framing beside a window is usually different from the repeated pattern across an open section of wall. A traditional wood-framed opening often includes full-height king studs at the sides, shorter jack or trimmer studs that help support the header, a sill below the window, and short cripple studs above or below the opening.
The header carries loads over the space where normal studs cannot continue through the opening. The American Wood Council explains that headers transfer loads above windows and doors to the adjacent studs.
Because several framing pieces may sit close together, a stud finder can show a broad solid area near the side of a window. This does not mean the entire wall uses unusually tight spacing. It usually reflects the extra support required around the opening.
Do not measure from the visible edge of the trim and assume the stud begins there. Window trim can extend beyond the rough opening, and shims or drywall returns may create a gap between the trim and structural framing. Scan outward from the window, mark both sides of each reading, and confirm the center before fastening.
How Far Apart Are Studs in a Closet?
Closet walls often use the same 16- or 24-inch-on-center pattern as nearby interior walls. However, the framing can become crowded around the closet doorway, inside corners, shelf supports, and built-in storage.
A door opening normally needs extra framing at both sides. Corners may contain several studs so drywall from two walls has a secure fastening surface. Builders or later owners may also add horizontal blocking for rods, shelves, cabinets, or hooks. This blocking can produce a strong stud-finder reading even though it runs sideways rather than from floor to ceiling.
Before installing a closet rod or shelf, locate support at several points. Scan vertically above and below the proposed screw location. If the reading stays in the same narrow line, it is more likely to be a full-height stud. A wide reading that appears only at shelf height may be blocking.
Closets can also hide plumbing stacks, wiring, and ductwork. This is especially important when the closet backs onto a bathroom, laundry room, kitchen, or mechanical space. Use suitable screw lengths and avoid drilling deeper than necessary.
Why Stud Spacing Changes Around Openings and Corners
Regular stud spacing works best across clear sections of wall. Doors, windows, intersecting walls, corners, and structural load points require additional framing, so the pattern may temporarily change.
At a corner, extra studs or backing may be installed to connect the walls and support the inside drywall. Around openings, headers and side studs redirect loads. Wall intersections may include added nailers, while cabinets, handrails, bathroom fixtures, and heavy trim may be supported by horizontal blocking.
Pipes, ducts, electrical boxes, and wiring also influence where framing can run. In some cases, studs are moved slightly, doubled, drilled, or notched under approved construction rules. Remodeling can add even more variation.
This is why finding two solid areas close together does not prove that all studs are spaced that way. Follow each suspected stud vertically and continue scanning across several framing bays. A repeated pattern provides stronger evidence than a single reading near a complicated part of the wall.
How to Use a Stud Finder Correctly
Start by reading the instructions for your model because stud finders do not all work the same way. Some must be placed flat against the wall before they are switched on so they can calibrate. Others continuously adjust as they move.
Place the tool on a clear section of wall, away from a corner or window. Hold it flat and move it slowly from side to side. When it signals an edge, mark that point lightly with a pencil. Continue moving until the signal ends, then mark the opposite edge. The center between those marks is the likely center of the stud.
Repeat the scan in the opposite direction. If the marks do not agree, recalibrate and try again slightly higher or lower. It is also helpful to confirm that the reading continues vertically.
Stud finders can react to more than wood. Metal fasteners, pipes, wiring, foil, damp areas, dense plaster, tile, and thick texture may affect the signal. A tool with wire or metal detection can provide useful warnings, but it does not make drilling risk-free. Treat unexpected readings as a reason to investigate further rather than ignore them.
Finding Studs Without a Stud Finder
A magnet is one of the simplest alternatives. Move a strong magnet slowly across the wall until it is attracted to a drywall screw or nail. Find several fasteners in a vertical line, then mark the likely stud center.
Electrical outlets and switches can also provide clues because their boxes are often fastened to the side of a stud. Turn off power before removing a cover plate, and do not place tools or fingers inside the box. Even after seeing which side appears attached, confirm the result elsewhere because some boxes are designed to clamp directly to drywall.
Baseboards and other trim may show tiny filled nail holes where carpenters fastened them to studs. Once you identify a likely stud, measure in 16-inch steps and test each position. If that pattern fails, try 24-inch steps. Tapping can help compare hollow and solid sounds, but it is less reliable on plaster, insulated walls, or textured surfaces.
As a last check, make a very small test hole in a hidden area using a thin hand-driven probe. Stop as soon as you meet resistance and never push deeply into the wall. Pipes and electrical wires can pass through studs, so hitting wood does not mean the area is automatically safe for a long screw. For uncertain walls or heavy installations, professional confirmation is the safer choice.
Conclusion
So, how far apart are studs? In most conventional U.S. wood-framed walls, 16 inches on center is the best starting assumption. Some walls use 24-inch-on-center framing, while metric systems commonly use roughly 400 or 600 millimeters. Drywall, apartments, closets, old houses, and 1970s homes may follow these patterns, but each can contain important exceptions.
Windows, doors, corners, intersections, repairs, blocking, metal framing, and hidden utilities can interrupt regular spacing. That is why measuring alone is not enough. Locate both edges of the suspected stud, mark its center, confirm that it continues vertically, and check the pattern at more than one point.
Before drilling, consider what may be inside the wall as well as where the framing sits. Use the shortest suitable fastener, watch for electrical or plumbing warnings, and stop when the evidence is unclear. A few extra minutes spent confirming the wall can prevent a weak installation, damaged wiring, a punctured pipe, or an expensive repair.
Frequently Asked Questions
How Far Apart Are Studs In Most Walls?
In most conventionally framed U.S. homes, studs are placed 16 inches apart on center. However, some approved walls use 24-inch spacing, so always confirm the actual position before drilling.
What Does 16 Inches On Center Mean?
It means the distance is measured from the center of one stud to the center of the next. With 1.5-inch-wide studs, the open space between them is about 14.5 inches.
How Far Apart Are Studs In Drywall Walls?
The framing behind drywall is commonly spaced 16 or 24 inches on center. Drywall seams and fastener marks may provide clues, but a stud finder gives a more reliable result.
Are Studs Always The Same Distance Apart In Old Houses?
No. Old houses may contain irregular spacing, rough-sawn lumber, plaster-and-lath walls, repairs, or additions. Check several areas instead of depending only on standard 16-inch measurements.
Can I Measure From A Window To Find A Stud?
A stud may be located beside a window, but visible trim does not show its exact position. Windows usually have extra framing, including king studs, jack studs, and a header.
Disclaimer: This article provides general educational information. Stud spacing and wall construction can vary according to building age, design, renovations, and local codes. Always check for hidden wiring, pipes, and other utilities before drilling.
Thanks for visiting Clearise Cleaning Services! Discover more helpful tips and expert cleaning insights by exploring our related categories.