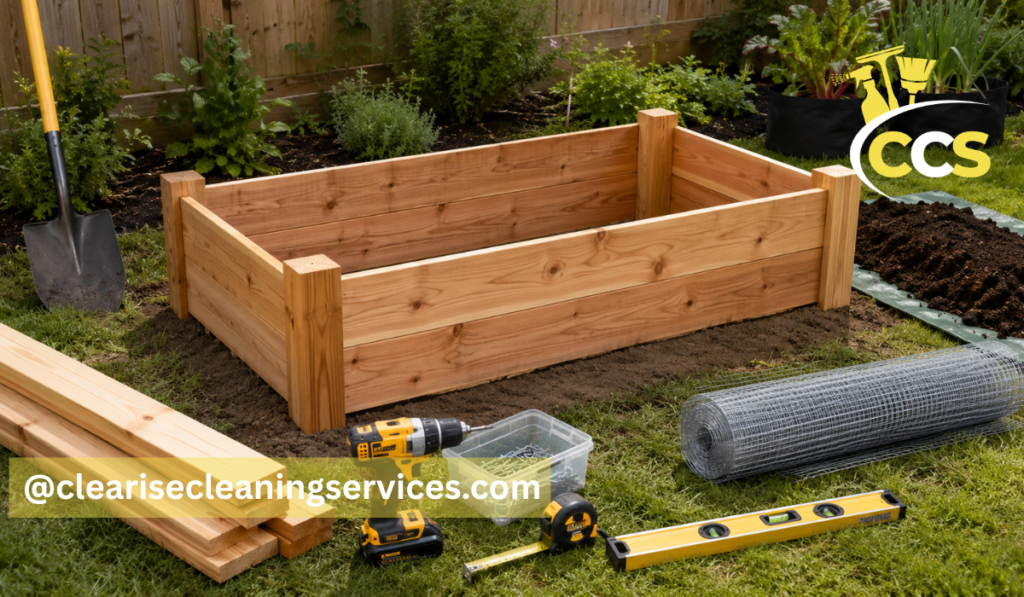
Learning how to build a raised garden bed is a practical way to create a cleaner, easier-to-manage growing space. A raised bed is a framed area filled with suitable soil above the natural ground level. It gives you more control over soil quality, helps excess water drain away, and reduces the need to work directly at ground level.
Raised beds also protect the growing area from foot traffic. Because you work from the paths, the soil stays loose instead of becoming compacted. University of Minnesota Extension recommends beds no wider than four feet when they can be reached from both sides, helping gardeners avoid stepping into the soil.
Wood is the most common choice, but you can also use bricks, pavers, concrete blocks, or a ready-made kit. An elevated bed with legs can help anyone who finds bending difficult. Whatever design you choose, the process involves selecting a suitable site, preparing the ground, building a stable frame, adding soil, and maintaining the bed over time.
Quick Guide: How to Build a Raised Garden Bed
| Step | What to Do | Helpful Tip |
| 1. Choose the location | Find a level area receiving 6–8 hours of sunlight | Keep the bed near a water source |
| 2. Select the size | A 4×8-foot bed is practical for most gardens | Keep the width at four feet or less |
| 3. Gather materials | Use untreated cedar, redwood, bricks, or concrete blocks | Choose outdoor screws for wooden beds |
| 4. Prepare the ground | Remove weeds, stones, and uneven soil | Check the area with a spirit level |
| 5. Build the frame | Join the side and end pieces securely | Measure diagonally to check that it is square |
| 6. Protect the base | Add hardware cloth where burrowing pests are common | Avoid solid plastic because it blocks drainage |
| 7. Add soil | Use topsoil, compost, and aeration material | Do not fill the bed with dense yard soil alone |
| 8. Water and settle | Water the soil and allow it to settle | Add more soil before planting if needed |
| 9. Plant the bed | Choose plants suited to the available sunlight | Leave enough space between mature plants |
| 10. Maintain it | Add compost, mulch, and soil when needed | Check the frame for damage each season |
Choosing the Best Size and Location
A 4×8-foot bed is popular because it offers 32 square feet of growing space while remaining easy to reach. The four-foot width lets most adults work from either side, and the eight-foot length provides room for vegetables, herbs, or flowers without making the frame difficult to build.
You can adjust the size to your needs. A three-foot-wide bed may suit children or gardeners with a shorter reach. If the bed will sit against a fence or wall, keep it about two feet wide so every plant remains accessible from the open side.
Most common vegetables need at least six hours of direct sunlight, while tomatoes, peppers, and cucumbers often benefit from more. Watch the area throughout the day before deciding. Choose a place near a water source and avoid low spots where rain collects.
Leave paths at least two feet wide, or wider for a wheelbarrow, garden cart, or wheelchair. A flat yard usually requires only light clearing. On a slope, cut a level shelf into firm ground or properly support the low side so the frame does not settle unevenly.
Materials and Tools You Will Need
For a durable wooden bed, untreated cedar, redwood, or another naturally rot-resistant wood is a sensible choice. Cedar is easy to work with and usually lasts longer than untreated pine. Clean, untreated wood also removes uncertainty about old preservatives. Penn State Extension recommends clean, untreated materials when gardeners want to reduce possible contact with contaminants.
For a deep 4×8-foot bed made from three stacked rows of 2×6 boards, you need nine 2×6×8-foot boards. Six stay full length for the long sides, and three are cut in half to form six four-foot end boards. You also need one 4×4×8-foot post cut into four 24-inch corner supports, plus corrosion-resistant exterior screws about three inches long.
Half-inch galvanized hardware cloth is useful where burrowing pests are common. You may also need plain cardboard, soil, compost, and mulch.
Essential tools include a tape measure, pencil, saw, drill, carpenter’s square, spirit level, shovel, rake, gloves, and eye protection. A raised garden bed kit is a useful alternative when you do not own cutting tools or want faster assembly.
Raised Garden Bed Plans, Measurements, and Cut List
Good measurements prevent wasted lumber and uneven corners. This plan creates a bed close to 4×8 feet with walls about 16½ inches high, since a nominal 2×6 board is usually about 5½ inches wide.
The basic cut list is:
- Six 2×6 boards at 8 feet for the long sides
- Six 2×6 boards at 4 feet for the ends
- Four 4×4 corner posts at 24 inches
- Exterior screws for every board-to-post connection
This design requires nine 2×6×8-foot boards in total. A list of only six boards would not provide enough lumber for all four sides stacked three boards high.
A simple raised garden bed plans PDF can show the top view, side view, cut list, screw positions, and finished measurements on one page. Compare any plan with your actual space before cutting.
For a shallow bed, use one board per side and shorter corner blocks. For poor native soil or deeper-rooted crops, stack two or three boards. An elevated design also needs legs, a supported floor, cross-bracing, and drainage holes.
How to Build a Raised Garden Bed Step by Step
Begin on a flat work surface. Measure three 2×6×8-foot boards at the four-foot center point and cut them in half, producing six matching end pieces. Cut the 4×4 post into four equal 24-inch supports.
To build one long side, place two corner posts parallel on the ground. Lay three full-length boards across them, stacking the boards with their edges close together. Keep the bottom board flush with the lower ends of the posts. Check the corners with a square, drill pilot holes to reduce splitting, and fasten each board to each post with two exterior screws. Repeat for the opposite side.
Stand the two long panels upright and place them four feet apart. Attach three four-foot boards at one end by driving screws into the corner posts. Repeat at the other end.
Measure both diagonals across the frame. If the measurements are equal, the box is square. Tighten loose connections and smooth any sharp edges. Move the empty frame to its prepared location before adding mesh or soil, since it will become too heavy to move afterward.
Preparing and Leveling the Ground
Mark the bed’s position and remove deep-rooted weeds, stones, branches, and other obstructions. Grass can be cut very short if you plan to cover it with cardboard, but aggressive weeds should be removed first.
Set the empty frame in place and check every side with a spirit level. Remove soil beneath high corners rather than placing loose soil under low corners whenever possible. Firm, undisturbed ground is less likely to sink after heavy rain.
On a gentle slope, create a level shelf for the full frame. A stronger slope may require a stepped layout or a properly supported retaining structure. Wet soil is heavy, so do not depend on a tall, unsupported downhill wall.
Plan the paths at the same time. Mulch, gravel, or stepping stones can reduce weeds and mud while giving you clean access for watering, harvesting, and repairs.
Drainage and Protection From Burrowing Pests
A ground-level raised bed should normally remain open at the bottom. Do not place a solid plastic sheet underneath, because trapped water can create wet, airless soil around plant roots. Good soil structure and an open base provide better drainage than a layer of rocks.
Where gophers, moles, or similar pests are a known problem, place half-inch hardware cloth beneath the frame before filling it. Cut the mesh slightly wider than the opening, overlap separate pieces, and secure the edges to the lower boards or posts. Oregon State University Extension notes that wire mesh or hardware cloth beneath raised beds can help exclude moles and gophers.
For weed control, lay overlapping sheets of plain brown cardboard over the ground. Remove tape and plastic labels, then wet the cardboard so it stays flat. It will gradually break down while still allowing water to pass through. Hardware cloth controls animals; cardboard helps suppress existing weeds.
Filling the Bed With the Right Soil Mix
Raised-bed soil should hold moisture while still allowing air and excess water to move through it. Avoid filling the bed entirely with dense backyard soil, especially heavy clay, because it may compact and drain poorly.
A useful starting blend is 40 percent screened topsoil, 40 percent mature plant-based compost, and 20 percent lighter material such as perlite, vermiculite, fine pine bark, or coconut coir. Treat this 40-40-20 rule as a flexible guide rather than a fixed formula. University of Minnesota Extension suggests roughly one-half to two-thirds topsoil and one-third to one-half plant-based compost, with adjustments when the topsoil contains a lot of clay.
More compost is not always better. Excess compost or manure may add too many nutrients or salts. Use finished compost from a reliable source and consider testing the mix before adding fertilizer.
A 4×8-foot bed about 16½ inches deep holds roughly 44 cubic feet, or around 1.6 cubic yards, before allowing for board thickness or a bottom filler layer. Buy a little extra because loose soil settles after watering.
To save money in a deep bed, place small untreated branches, dry leaves, and other clean plant material in the bottom few inches. Keep a generous depth of true growing mix above it. Avoid diseased plants, invasive weeds with seeds, oily food, meat, and treated wood. Water the filled bed, allow it to settle, and top it up before planting.
How to Build a Raised Garden Bed Cheap
A cheap bed should still be strong enough to last. A weak frame that fails after one or two wet seasons may cost more than a simple, well-built design.
Save money by using standard board lengths and avoiding complicated cuts. A shallow bed made from one row of boards needs much less lumber and soil than a three-row frame. It may be enough when the native ground already drains well.
Untreated pine or fir costs less than cedar, although it generally has a shorter life. Reclaimed lumber should be used only when you know its history and can confirm it is free from paint, oil, creosote, or older preservatives. University of Minnesota Extension advises avoiding old lumber when its past treatment is uncertain.
Bulk soil and compost are often cheaper than bags. Clean leaves or small branches can reduce the amount of mix needed in a deep bed. However, do not save money by removing corner supports, using indoor screws, or building on unstable ground. Strong corners and exterior hardware protect the entire project.
How to Build a Raised Garden Bed With Legs
A raised garden bed with legs is a large planting container supported above the ground. It has side walls, a soil-holding base, and four or more legs. This style works well on patios and for gardeners who prefer to stand or sit while working.
Choose a comfortable height and keep the bed narrow enough to reach without leaning. A compact size such as 2×4 feet is easier to support than a full 4×8 elevated bed.
Wet soil is extremely heavy. Use strong exterior-grade boards or suitable panels for the base, supported by crosspieces. Place legs beneath the corners and add center legs on longer beds. Cross-bracing between the legs prevents side-to-side movement.
Drill several drainage holes in the floor. Add a durable, water-permeable liner or fine mesh that holds soil without trapping water. Before filling, check the frame for wobbling and place it on a firm, level surface.
Building a Cheap Raised Garden Bed With Legs
The safest way to reduce the cost of an elevated bed is to make it smaller, not weaker. A 2×3-foot or 2×4-foot planter needs less wood, soil, and support while still holding herbs, lettuce, strawberries, or compact vegetables.
Use affordable exterior-grade lumber for the frame, but keep the load-bearing parts thick enough to resist bending. Reinforce the corners, add simple diagonal braces, and place a central support beneath the floor to prevent sagging.
Landscape fabric or fine permeable mesh can serve as a low-cost liner. Fill the planter with a lighter container mix rather than heavy field soil.
Do not cut costs on the legs, base, fasteners, drainage, or bracing. Failure in any of these parts can cause the entire load to fall. A small, stable planter is more useful than a large, unsafe one.
How to Build a Raised Garden Bed With Bricks
Brick beds are attractive and do not rot, but they require a firm, level foundation. Mark the outline, remove loose topsoil, and compact the base. Depending on the height and local conditions, a shallow layer of compacted gravel or leveling sand may help.
Lay the first row carefully and check it along the length and width. Stagger the joints so each brick overlaps the joint beneath it. A low, broad bed may be dry-stacked, while a taller or narrow wall often needs mortar and a proper footing.
Use exterior-rated bricks, especially in areas with freezing winters. Leave the soil bottom open for drainage. Brick can warm the soil near the edges, which may help in cool weather but can increase drying in hot climates.
Brick beds are durable and visually appealing, but they usually cost more and take longer to build than a basic wooden frame.
How to Build a Raised Garden Bed With Concrete Blocks
Concrete blocks make a strong frame without requiring lumber cuts. Prepare a compact, level base and place the first row with the open cells facing upward. Use a string line and spirit level to keep the blocks straight.
Stagger the joints in the next row to improve stability. A low bed may be dry-stacked, but a taller wall may need adhesive, mortar, or reinforcement. Follow local guidance if the structure is high enough to act as a retaining wall.
You can fill the open cells with soil for small herbs or flowers, although these spaces dry faster than the main bed. Smooth cap blocks can cover rough or sharp upper edges.
Use clean blocks from a known source rather than broken material from an industrial site. Concrete beds are long-lasting but heavy, difficult to move, and less flexible than wooden frames.
Raised Garden Bed Kit Versus a DIY Build
A raised garden bed kit is often easiest for beginners. Its panels are pre-cut, the hardware is included, and assembly may require only basic tools. Kits come in wood, galvanized metal, composite materials, and plastic. They offer quick results but may limit size choices and replacement options.
A DIY bed needs more planning, cutting, and drilling. In return, you can choose the exact dimensions, height, materials, and corner design. Individual boards are also easier to replace when damage occurs.
Compare the complete cost, including delivery, tools, soil, mesh, liners, and path materials. A kit may offer better value when you would otherwise need to buy tools. DIY may cost less when you already own the equipment or want several beds.
Choose a kit when speed and simple assembly matter most. Choose DIY when customization, repair, or fitting an unusual space is more important. Either option can work well when the frame is stable, drains properly, and uses materials suited to outdoor conditions.
Conclusion
Understanding how to build a raised garden bed begins with a suitable location and an accurate plan. A four-foot width keeps the center within reach, while a level foundation prevents twisting and settling. Safe materials, firm corner supports, exterior hardware, open drainage, and balanced soil matter more than decorative extras.
Wood is easy to customize, while bricks and concrete blocks offer long-term strength. A bed with legs improves access, and a raised garden bed kit can save time. The best design is the one that fits your space, budget, tools, climate, and physical needs.
Check the bed each season. Tighten loose screws, replace damaged boards, renew mulch, add compost in sensible amounts, and top up settled soil. With careful construction and simple maintenance, a well-built raised garden bed can remain productive for years without becoming an expensive or complicated project.
Frequently Asked Questions
What Is The Best Size For A Raised Garden Bed?
A 4×8-foot raised bed is a popular choice because it provides plenty of growing space. Keeping it four feet wide also allows you to reach the center from both sides.
How Deep Should A Raised Garden Bed Be?
Most vegetables grow well in a bed that is 10–12 inches deep. Root vegetables and plants grown over poor or compacted ground may benefit from 16–24 inches of soil.
What Should I Put At The Bottom Of A Raised Garden Bed?
You can place hardware cloth at the bottom for pest protection and plain cardboard for weed control. Avoid solid plastic because it can trap water and restrict natural drainage.
What Is The Best Soil Mixture For A Raised Garden Bed?
A useful starting mix contains 40 percent topsoil, 40 percent mature compost, and 20 percent aeration material. Adjust the mixture based on drainage, plant needs, and local soil conditions.
Is It Cheaper To Build Or Buy A Raised Garden Bed?
Building a simple wooden bed is often cheaper when you already own the necessary tools. A raised garden bed kit may offer better value when convenience and quick assembly matter more.
Disclaimer: This article provides general gardening and DIY information. Material suitability, construction needs, drainage, soil requirements, and local building rules may vary by location. Follow manufacturer instructions, use proper safety equipment, and seek professional advice for large, elevated, or retaining-wall-style beds.
Thanks for visiting Clearise Cleaning Services! Discover more helpful tips and expert cleaning insights by exploring our related categories.